In the field of dental implant restoration, precision is the core element that determines clinical outcomes. From implant placement to the final restoration seating, even a micron-level deviation at any stage can affect long-term stability and aesthetic results. Among these steps, the accurate capture of the implant impression is the cornerstone of successful restoration—it serves as a “three-dimensional oral map” for the dental laboratory, with the impression coping acting as the key coordinate system for constructing this map. As a converter connecting the internal interface of the implant with the external model, the impression coping must not only ensure perfect adaptation between the impression material and the implant but also eliminate human operational errors through standardized design. Represented by the Nobel NP impression coping, advanced systems featuring a mechanical interlock design for narrow platform implants, deformation-resistant materials, and digital compatibility are redefining the precision standards of implant impressions, offering clinicians a solution that breaks through traditional limitations.
What is an Impression Coping?
An impression coping is a key instrument used in dental implant restoration to accurately transfer the three-dimensional position of an implant. By precisely matching with the implant’s internal interface (such as thread or conical connection) and being secured onto the top of the implant, it serves as a “positioning reference” during impression taking, enabling a 1:1 replication of the implant’s spatial position, angle, and axial orientation onto the dental laboratory model.
The core function of the impression coping is to standardize the transmission of positional information. Clinically, the dentist attaches it to the placed implant and takes the impression using two methods:
- Open-tray impression: A hole is made in the tray to expose the impression coping. After injecting the impression material, the entire set is removed together, ensuring absolute adaptation between the impression coping and the implant.
- Closed-tray impression: The entire tray is removed with the impression material, and the impression coping is later repositioned indirectly through a transfer coping. This method is suitable for implants placed deeper or in areas with limited operating space.
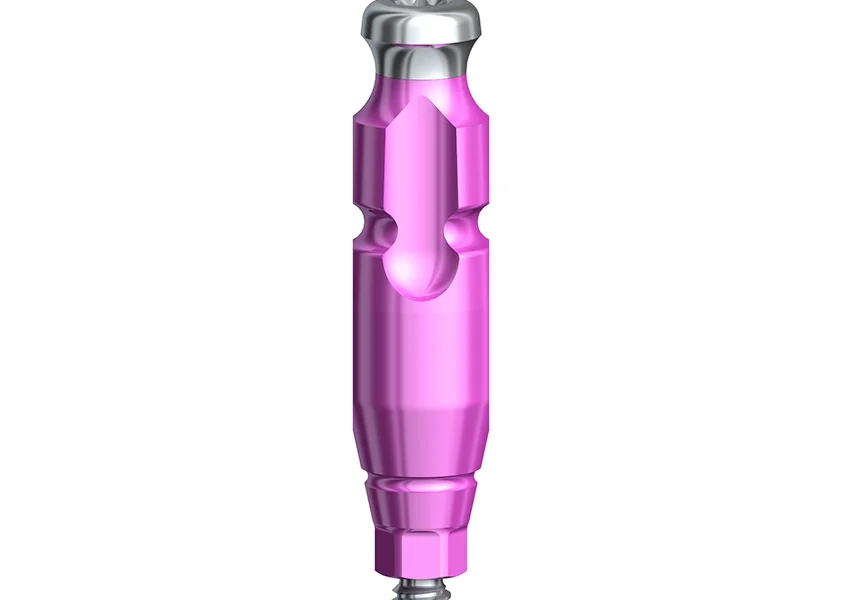
The accuracy of the impression coping directly affects the quality of the final restoration. If there is even a micron-level error in the connection between the impression coping and the implant, it may cause marginal misfit of the restoration or occlusal discrepancies, leading to food impaction, plaque accumulation, or even peri-implantitis. For instance, the Nobel NP impression coping, specifically designed for narrow platform implants, features an anti-rotation structure and optimized wall thickness to ensure precise connection with the abutment, keeping errors within clinically acceptable limits.
What is the Nobel NP Impression Coping?
- Specifically Designed for Narrow Platform Implants
The Nobel NP Impression Coping is a dedicated impression component developed by Nobel Biocare for its NP (Narrow Platform) implant system. This series of implants has a smaller diameter (typically 3.5–4.0 mm), making it ideal for cases with limited alveolar bone width or confined spaces such as the anterior aesthetic zone. The impression coping precisely matches the implant’s unique conical connection or anti-rotational hex structure, ensuring zero-error transfer of the implant’s position, axis, and angulation to the dental laboratory model during impression taking—laying a solid foundation for the accurate seating of the final restoration. - Open-Tray and Closed-Tray Options
According to clinical needs, the Nobel NP Impression Coping comes in two versions, each with clearly defined applications:
- Open-Tray Impression Coping
- Indications: Multiple implant splint restorations, cross-arch complex cases, or full-mouth reconstructions requiring extremely high precision.
- Advantages: The impression tray is pre-perforated to expose the coping, allowing the clinician to directly observe and adjust the coping’s seating position, preventing displacement caused by impression material coverage. When used with high-elasticity silicone materials (such as polyether rubber), it can capture micron-level details around the implant, especially suitable for bone-level implants or restorations requiring passive fit.
- Closed-Tray Impression Coping
- Indications & Advantages: The impression coping is removed together with the impression tray and later repositioned indirectly via a transfer coping. This method is simple to operate and reduces patient discomfort but relies on the clinician’s experience to ensure the accurate reseating of the transfer coping and impression coping.
- Color Coding and Mechanical Design
- Color Coding System: Each NP impression coping adopts an international standard color code (e.g., pink for 3.5 mm diameter, blue for 4.0 mm), enabling clinicians to quickly identify the correct model and avoid mismatches that could result in restoration misfit.
- Anti-Rotation and Retentive Design: The neck of the impression coping features grooves or raised structures that form a mechanical interlock with the implant’s internal interface, effectively resisting torsional forces during impression taking and preventing coping loosening or displacement.
- Material Optimization: The main body is made of medical-grade titanium alloy or PEEK polymer, ensuring both strength and biocompatibility while avoiding metal ion release that could interfere with the polymerization of impression materials.
- Clinical Value
- Improved Efficiency: The standardized design shortens adjustment time during impression procedures and is especially suited for digital workflows (such as chairside CAD/CAM), enabling “immediate impression and immediate fabrication.”
- Reduced Complications: Accurate impressions minimize marginal microleakage of restorations and help prevent peri-implantitis.
- Enhanced Aesthetic Outcomes: In the anterior region, the precise transfer achieved by the NP impression coping ensures perfect adaptation between the restoration margin and the gingival cuff, creating a natural transition of “pink and white aesthetics.”
Selecting the Appropriate Implant Impression Base
Accurate selection of the implant impression base is a critical step in ensuring the long-term stability and aesthetic outcome of the restoration. The decision should comprehensively evaluate the following clinical factors to achieve a balance between personalized treatment and standardized operation:
1. Compatibility with Implant System and Platform Size
Core Principle:
The impression base must fully match the implant brand, model, and platform size (e.g., Narrow Platform [NP], Regular Platform [RP], Wide Platform [WP]) to avoid connection loosening or angular deviation caused by interface design discrepancies.
Example:
The Nobel NP impression base is specifically designed for narrow platform implants. Its conical connection structure is incompatible with regular platform bases—forced use may result in impression errors exceeding 50 μm (the clinically acceptable threshold).
Verification Methods:
- Refer to the implant system’s technical manual to confirm the correspondence between the base model and implant diameter (e.g., 3.5 mm / 4.0 mm) and thread type (e.g., Butterfly, Tapered).
- Use a brand-specific identification toolkit (such as Nobel’s Implant Identification Kit) to assist in recognizing the implant type.
2. Adaptation to Gingival Biotype and Soft Tissue Height
Clinical Significance:
Gingival thickness (thin type < 2 mm / thick type > 2 mm) and the level of attachment directly affect the exposure and retention of the impression base.
- Thin Gingival Biotype:
Choose a low-profile base to minimize soft tissue compression and avoid gingival recession that could expose the restoration margin. - Thick Gingival Biotype:
Standard or high-profile bases can be used to utilize soft tissue elasticity for enhanced stability.
Operational Tips:
- Measure gingival thickness preoperatively with a probe or use CBCT to assess bone dehiscence risk.
- Adjust transmucosal height (e.g., Nobel NP offers 3 mm / 5 mm / 7 mm options) to ensure the impression material fully covers the base shoulder, preventing model fractures.
3. Case Complexity and Accessibility
- Open-Tray Base:
- Indications: Multiple implants splinted together, cross-arch restorations, bone-level implants, or cases requiring passive fit.
- Advantages: Direct exposure allows the clinician to observe seating accuracy and reduces displacement caused by impression material.
- Limitations: Requires a larger mouth opening (> 40 mm) and longer operating time.
- Closed-Tray Base:
- Indications: Single-tooth restorations, limited posterior access, restricted mouth opening, or low patient tolerance.
- Advantages: Simple operation and reduced chairside time through indirect positioning with a transfer coping.
- Limitations: Depends heavily on clinician experience to ensure accurate reseating; error rates are 15%–20% higher than the open-tray method.
- Hybrid Strategy:
In complex full-arch cases, a combination of open-tray impression and digital scan verification can be used to ensure both precision and efficiency.
4. Special Considerations for the Nobel NP System
- Connection Design Verification:
The Nobel NP implant employs a Morse taper (11°) combined with an anti-rotational hex structure for dual retention. The impression base must match via a dedicated screw or clip system.
Using bases from other systems may lead to taper mismatch, causing micromovement and increasing the risk of screw loosening. - Dynamic Navigation Compatibility:
Some Nobel NP bases are compatible with dynamic navigation systems (such as X-Guide), enabling real-time tracking of base position to optimize implant placement and restoration paths—especially valuable in immediate restoration cases.
5. Synergy Between Impression Materials and Bases
- Material Selection:
- Open-Tray: Recommended use of high-elasticity addition silicone (e.g., Impregum), which flows well to capture fine base details.
- Closed-Tray: Fast-setting polyether materials (e.g., Permadyne) are suitable for shorter working times, but base surface treatment (such as sandblasting) is needed to improve adhesion.
- Base Surface Treatment:
- Titanium Alloy Bases: Undergo anodic oxidation to reduce metal ion release that could inhibit impression material polymerization.
- PEEK Bases: Treated with plasma coating to increase surface roughness and enhance mechanical bonding with impression materials.
Step-by-Step Guide: How to Accurately Capture Implant Impressions (Nobel NP System)
Accurate capture of implant impressions is a core step for the long-term success of restorations. The following is a standardized workflow based on Nobel NP impression copings, combined with key control points and risk mitigation strategies to ensure predictable clinical outcomes.
Step 1: Preoperative Preparation and Implant Platform Cleaning
Key Points:
- Remove the Healing Abutment: Use the provided screwdriver or hand wrench (torque controlled at 10–15 Ncm) to rotate counterclockwise and remove the healing abutment. Avoid excessive force to prevent damage to implant threads.
- Clean the Implant Platform:
- Blow out the implant interior and shoulder with an air syringe to remove blood clots or food debris.
- Wipe threads and edges with a cotton ball soaked in 75% alcohol. Do not use phenol-containing disinfectants (may inhibit impression material polymerization).
Critical Tip:
If there is soft tissue overgrowth around the implant neck, trim with a 15C blade to make it flush with the shoulder, preventing impression material tearing.
Step 2: Impression Coping Placement and Seating Verification
Key Points:
- Select the Matching Size: Choose the corresponding color of Nobel NP impression coping based on implant diameter (3.5 mm / 4.0 mm, e.g., pink = 3.5 mm).
- Manual Screw-In: Align the coping vertically with the implant center and rotate clockwise until hand-tightened (approximately 3–4 turns). Avoid using instruments to force it, which may deform the taper.
- Optional X-ray Verification:
- Indications: Bone-level implants, deep implants, or visually inaccessible areas.
- Standard: The coping shoulder should completely align with the implant shoulder; gap ≤ 0.2 mm.
Step 3: Impression Material Injection and Tray Placement
Key Points:
- Material Selection:
- Open-Tray: Recommend high-elasticity addition silicone (e.g., Impregum Pentasoft), applied in two steps (heavy body for base + light body for surface).
- Closed-Tray: Fast-setting polyether (e.g., Permadyne Elastomer), single-step injection to shorten operation time.
- Injection Technique:
- Start from the distal side of the coping and inject along the gingival margin in a figure-8 pattern, ensuring the material fully covers the coping shoulder and penetrates threads.
- Tip: Avoid air bubbles; gently press around the coping with a probe to eliminate trapped air.
- Tray Placement:
- Open-Tray: Pre-perforated tray exposes the coping; apply vertical pressure while seating to prevent lateral forces from displacing the base.
- Closed-Tray: Wait until the material reaches “initial set” (polyether ~1.5 min, silicone ~3 min) before removing the tray.
Step 4: Impression Removal and Analog Placement
Key Points:
- Removal Method:
- Open-Tray: Use the provided screwdriver to unscrew the coping counterclockwise gently to prevent model fracture.
- Closed-Tray: Remove the tray with the impression, separate the transfer coping, and insert the implant analog (e.g., Nobel NP Analog).
- Analog Alignment:
- Screw the analog into the remaining hole of the impression coping by hand until it reaches the same seating depth as the coping.
- Verification: The analog shoulder on the model should completely align with the coping shoulder; deviation ≤ 0.1 mm.
Step 5: Model Pouring and Quality Check
Key Points:
- Pouring Material: Use ultra-hard stone (e.g., Fujirock EP) or resin; mix at a powder-to-liquid ratio of 100 g:20 ml, vacuum mix for 30 seconds before pouring.
- Separation Timing: Wait until fully set (~1 hour), then gently pry the model from the tray edge with a surgical blade.
- Quality Check:
- Visual: No bubbles or defects around implant analogs; shoulder edges clear.
- Measurement: Use a caliper to measure analog spacing on the model; deviation from intraoral measurement should be < 0.3 mm.
Precision Tips and Risk Mitigation
- Avoid Excessive Pressure: Apply uniform pressure over the tray surface; single-point pressure > 50 N may displace the coping.
- Time Control: Polyether must be injected within its working time (~2 min); exceeding this may thicken the material and affect detail capture.
- Temperature Management: In winter, pre-warm impression material in 37°C water to reduce polymerization delay caused by low temperature.
- Emergency Handling: If the coping falls off, clean the implant platform again and use a new coping. Do not reuse the old base (risk of contamination causing unstable connection).
By following this standardized workflow and controlling key details, the accuracy of Nobel NP impression capture can reach over 98% (clinical research data). Clinicians should flexibly adjust according to patient anatomy and system characteristics to achieve precise transfer from impression to final restoration.
Conclusion
Implant impression copings play a critical role in achieving long-term restoration success. For Nobel Biocare users, the Nobel NP impression coping offers unparalleled accuracy and stability, helping clinicians create restorations that are natural in appearance and perfectly adapted.
By understanding the types of impression copings, selection criteria, and proper handling techniques, dental professionals can significantly enhance accuracy and patient satisfaction.
🦷 Looking for high-quality implant impression copings?
Explore our implant impression coping accessories collection—enjoy free worldwide shipping on orders over $100!