Insufficient bone height is a problem frequently encountered by clinicians during implant treatment in the posterior maxilla. When the distance between the maxillary sinus floor and the alveolar crest is too short, the existing bone volume is often insufficient to provide stable support for an implant. Direct implant placement may lead to complications such as implant penetration into the maxillary sinus and insufficient primary stability.
A sinus lift surgically elevates the maxillary sinus membrane, creates space for bone augmentation beneath the sinus floor, and places bone graft material as needed, providing better bone conditions for implant placement. This technique has become a routine solution for cases involving insufficient bone volume in the posterior maxilla.
This article will systematically introduce the working principles, indications, main surgical approaches, operating procedures, postoperative precautions, and clinical instrument selection for sinus lift surgery, helping readers develop a comprehensive understanding of this technique.
What Is a Sinus Lift in Dentistry?
A sinus lift, also known as maxillary sinus floor elevation, sinus augmentation, or sinus grafting, is a bone augmentation surgical technique used to address insufficient bone height in the posterior maxilla.
The maxillary sinus is an air-filled cavity located above the maxillary premolars and molars and communicates with the nasal cavity. The inside of the maxillary sinus is covered by a thin layer of mucosal tissue, clinically known as the maxillary sinus membrane and commonly referred to as the Schneiderian membrane. The thickness of this membrane varies from person to person and is usually approximately 0.5 to 1 mm. It is delicate and must be carefully protected during surgery.
The core procedure of a sinus lift involves gently separating the maxillary sinus membrane from the bony wall of the sinus floor and elevating it upward, thereby creating a new space beneath the membrane. Depending on the needs of the case, the clinician may place bone graft material into this space. After a period of healing, the newly formed bone tissue can provide sufficient bone height and density for simultaneous or delayed implant placement.
It should be clarified that the term “sinus lift” refers to elevating the sinus membrane and creating space beneath it. It does not mean that the entire maxillary sinus cavity is moved upward. The anatomical position of the maxillary sinus itself remains unchanged; what changes is the distribution of bone volume between the sinus floor and the alveolar ridge.
Why Might Dental Implant Placement Require a Sinus Lift?
Alveolar Bone Resorption After Tooth Loss
After the loss of posterior maxillary teeth, the alveolar bone no longer receives functional stimulation from the tooth roots and may gradually undergo resorption and atrophy. The longer the teeth have been missing, the more insufficient the residual bone height and width in the implant area may become.
When the existing bone volume cannot stably support an implant of appropriate length and diameter, the clinician usually needs to consider a bone augmentation procedure. A sinus lift is one of the most commonly used methods.
Maxillary Sinus Pneumatization
After the loss of posterior maxillary teeth, the maxillary sinus may gradually expand toward the alveolar ridge. This process is clinically known as maxillary sinus pneumatization. Pneumatization lowers the position of the sinus floor, further reducing the available bone height between the sinus floor and the alveolar crest.
In clinical practice, alveolar bone resorption and maxillary sinus pneumatization often occur together. Both contribute to insufficient vertical bone volume in the posterior maxilla, making this one of the most common anatomical challenges in implant treatment in this region.
Periodontal Disease, Infection, and Trauma
Severe periodontal disease may cause significant alveolar bone loss in the posterior maxilla, particularly vertical bone resorption. Chronic periapical infection, extraction trauma, or maxillofacial trauma may also cause localized bone defects and compromise the conditions for implant placement.
In addition, any previous surgery performed in this region, such as cyst curettage or apical surgery, should also be included in the preoperative assessment because these procedures may alter the local anatomy and increase surgical difficulty.
The Patient’s Anatomical Conditions
Some patients naturally have large maxillary sinuses or low sinus floors. Even if their teeth have not been missing for long, they may still have insufficient available bone height.
Anatomical variations such as an irregular sinus floor, convex sinus walls, or a sinus septum may increase the difficulty of membrane separation and the risk of perforation. Whether a sinus lift is required and which surgical approach should be selected must be determined through detailed imaging examinations rather than clinical examination or experience alone.
How Does a Clinician Determine Whether a Patient Needs a Sinus Lift?
Before deciding whether to perform a sinus lift, the clinician must conduct a comprehensive preoperative assessment, which usually includes the following steps.
First, an oral clinical examination is performed to evaluate the condition of the soft tissue in the edentulous area, the shape and width of the alveolar ridge, and the health of the adjacent teeth.
Next, a panoramic radiograph is used for an initial assessment of the general shape of the maxillary sinus, the position of the sinus floor, and the overall amount of residual bone. A panoramic radiograph provides a comprehensive view, but it is insufficient for precise measurements because of image superimposition and magnification distortion.
More importantly, cone-beam computed tomography (CBCT) is used for three-dimensional assessment. CBCT provides clear coronal, sagittal, and axial images, helping the clinician accurately measure residual bone height and alveolar ridge width, observe the shape and thickness of the maxillary sinus floor, identify the presence and location of sinus septa, assess the thickness and condition of the sinus membrane, and check for mucosal thickening, cysts, or other abnormalities within the maxillary sinus.
During the assessment, the clinician will focus on the following factors:
- Residual bone height (RBH)
- Alveolar ridge width
- Shape of the maxillary sinus floor
- Location and size of maxillary sinus septa
- Thickness and condition of the sinus membrane
- Presence of any lesions within the maxillary sinus
- Diameter and length of the planned implant
- Whether sufficient primary implant stability can be achieved
If the patient has a history of chronic sinusitis, previous sinus surgery, or other sinus abnormalities, further evaluation by an otolaryngologist may be required. It should be emphasized that the surgical approach cannot be determined solely on the basis of a fixed bone-height measurement. Multiple factors, including bone volume, bone density, sinus floor anatomy, implant design, and the clinician’s experience, should be considered together.
What Are the Main Sinus Lift Techniques?
Lateral Sinus Lift
A lateral sinus lift, also known as the lateral window approach, is a surgical technique in which a bony window is created in the lateral wall of the maxilla to access the maxillary sinus.
During surgery, the clinician first raises a mucoperiosteal flap to expose the lateral wall of the maxilla. A specialized round bur or piezosurgical instrument is then used to prepare a bony window in the lateral wall. The maxillary sinus membrane can be viewed directly through the window. The clinician uses sinus membrane elevators to gently separate the membrane from the sinus floor and surrounding bony walls before elevating it upward. Bone graft material is then placed beneath the sinus membrane, and the surgical site is closed with sutures.
A lateral sinus lift is generally indicated for cases with limited residual bone height, commonly considered to be less than 4–6 mm, or when extensive bone augmentation is required. Depending on the remaining bone volume and the primary stability of the implant, the implant may be placed simultaneously, or bone grafting may be completed first, followed by implant placement several months after healing.
The advantages of the lateral approach include a relatively clear surgical field, the ability to separate the sinus membrane under direct visualization, the ability to achieve a larger sinus floor elevation, and more controlled management of complex anatomical conditions such as sinus septa. Its limitations are that it requires flap elevation and the creation of a bony window. The surgical area is generally larger, postoperative swelling and discomfort may be more noticeable, and the healing period may be longer.
Crestal Sinus Lift
A crestal sinus lift, also known as the transalveolar approach or crestal approach, is a surgical method that accesses and treats the maxillary sinus floor through the alveolar crest or implant osteotomy.
Unlike the lateral approach, a crestal sinus lift does not require the creation of a large bony window in the lateral wall of the maxilla. Instead, during implant osteotomy preparation, specialized instruments are used from the direction of the alveolar crest to treat the bony wall of the sinus floor and gently elevate the sinus membrane. Under suitable conditions, a crestal sinus lift can usually be performed simultaneously with implant placement.
A crestal sinus lift is generally indicated for cases with a certain amount of residual bone, commonly considered to be at least 4–6 mm, and requiring only limited vertical elevation, generally within 3–4 mm. Its advantages include a smaller surgical access point, no need for an additional lateral incision or bony window, relatively less trauma, milder postoperative reactions, and a shorter treatment period.
It should be noted that the crestal approach does not allow the clinician to directly observe membrane separation in the same way as the lateral approach. Therefore, case selection and depth control are extremely important. For cases involving severely insufficient residual bone, complex sinus floor anatomy, or the need for extensive elevation, the lateral approach may be a safer option.
What Is the Difference Between Crestal and Lateral Sinus Lifts?
Comparison Item: Surgical Access
Crestal Sinus Lift: Through the alveolar crest or implant osteotomy
Lateral Sinus Lift: Through a bony window in the lateral wall of the maxilla
Comparison Item: Surgical Area
Crestal Sinus Lift: Relatively small
Lateral Sinus Lift: Relatively large
Comparison Item: Indications
Crestal Sinus Lift: Some residual bone is present and limited elevation is required
Lateral Sinus Lift: Less residual bone is present and extensive augmentation is required
Comparison Item: Membrane Visualization
Crestal Sinus Lift: The entire elevated area usually cannot be viewed directly
Lateral Sinus Lift: Provides a more direct surgical view
Comparison Item: Implant Placement
Crestal Sinus Lift: Can be performed simultaneously under suitable conditions
Lateral Sinus Lift: Can be performed simultaneously or in stages
Comparison Item: Main Instruments
Crestal Sinus Lift: Bone-grinding drills, stoppers, depth gauges, and bone graft delivery instruments
Lateral Sinus Lift: Lateral window burs, sinus membrane elevators, and bone grafting instruments
Comparison Item: Clinical Focus
Crestal Sinus Lift: Precise depth control and protection of the sinus membrane
Lateral Sinus Lift: Creating the bony window and performing extensive membrane elevation
It should be emphasized that neither technique is absolutely superior to the other. The choice of technique should be based on the patient’s residual bone volume, sinus floor anatomy, bone augmentation requirements, general health, and the clinician’s experience and technical preferences. A crestal approach should not be selected solely because the patient prefers “less trauma,” as an inappropriate choice of technique may increase surgical risks and the incidence of complications.
What Is the Difference Between the Traditional Osteotome Technique and a Drill-Based Crestal Sinus Lift?
Traditional Osteotome Elevation
Traditional crestal sinus lift surgery usually uses an osteotome to treat the sinus floor. After preparing the implant osteotomy close to the sinus floor, the clinician inserts the osteotome into the osteotomy and gently taps it to create a greenstick fracture in the thin cortical bone of the sinus floor. The bone is displaced upward, which elevates the sinus membrane.
This technique requires the clinician to precisely control the direction and depth of the osteotome and the force of tapping to avoid excessive force that could cause sinus membrane perforation or excessive displacement of the bone segment. Some patients may feel uncomfortable with the tapping during surgery. The tapping procedure may also cause temporary dizziness or discomfort, although the actual risk depends on the specific technique, the clinician’s experience, and the individual patient.
Drill-Based Crestal Sinus Lift
The drill-based crestal sinus lift is a technique that has been developed in recent years. It uses specially designed bone-grinding drills, such as diamond burs or dedicated sinus drills, to gradually approach and treat the maxillary sinus floor.
Unlike the traditional osteotome technique, the drill-based approach does not rely on repeated tapping. Instead, it gradually removes bone from the sinus floor through the grinding action of the drill. When used with stoppers, the drilling depth can be precisely controlled, helping to prevent uncontrolled entry into the maxillary sinus cavity. A dedicated drill-based system can usually integrate osteotomy preparation, sinus floor treatment, bone graft delivery, and material distribution into a single workflow, making the procedure more continuous and standardized.
Specialized instruments can help improve the precision of depth control and the consistency of the procedure. However, it must be clarified that instruments themselves cannot replace clinical training, anatomical knowledge, or professional judgment. The clinician must still adjust the surgical strategy flexibly according to the specific circumstances of each case.
Basic Procedure for a Crestal Sinus Lift
Step 1: Preoperative Examination and Treatment Planning
Before surgery, CBCT is used to accurately measure the residual bone height and width and to assess the anatomy of the maxillary sinus floor, the condition of the sinus membrane, and the presence of maxillary sinus septa. Based on the measurements, the position, direction, diameter, and length of the implant are determined, and any active maxillary sinus disease is ruled out or treated.
A drill of the appropriate diameter and a stopper of the corresponding length are selected according to the imaging measurements to ensure precise intraoperative depth control.
Step 2: Establishing the Initial Implant Osteotomy
An initial drill, such as a round bur or pilot drill, is used to locate the planned implant position and determine the entry point of the implant osteotomy. The correct direction must be maintained during osteotomy preparation to prevent deviation. Drills of different diameters are then used progressively to enlarge the osteotomy according to the diameter of the planned implant.
Adequate irrigation is required throughout osteotomy preparation to reduce the heat generated by drilling and prevent thermal damage to the bone.
Step 3: Gradually Approaching the Maxillary Sinus Floor
A bone-grinding drill of the appropriate diameter is used to progressively treat the bone. A stopper of the corresponding length is selected according to the preoperative measurements to ensure precise and controlled drilling depth. Extra caution should be exercised when approaching the sinus floor. The osteotomy depth should be checked regularly to avoid uncontrolled penetration into the maxillary sinus cavity.
The key to this step is to maintain the integrity of the sinus membrane while removing the bone from the sinus floor.
Step 4: Treating the Sinus Floor and Elevating the Sinus Membrane
Specialized instruments are used to treat the cortical bone of the maxillary sinus floor and gradually create an elevated space beneath the sinus membrane. During the procedure, the integrity of the sinus membrane must be assessed, and the required elevation height should be determined according to the specific circumstances of the case.
The elevation height should be determined by considering the bone height required for the implant, the anatomy of the sinus floor, and the expected healing outcome of the bone graft material.
Step 5: Delivering the Bone Graft Material
Bone graft material is delivered through the implant osteotomy into the elevated space beneath the sinus membrane. Bone graft carriers, pushers, and distribution instruments are used to handle the graft material and distribute it as evenly as possible within the elevated space, avoiding localized voids or material accumulation.
Whether bone graft material is used, what type of material is selected, and how much is used should be determined according to the specific surgical technique and case. In some cases with sufficient residual bone and limited elevation, no additional bone graft material may be used. Instead, healing may rely on the blood clot formed after elevation and the bone’s regenerative capacity.
Step 6: Placing the Implant
If the residual bone volume can provide sufficient primary implant stability, simultaneous implant placement may be considered. If sufficient primary stability cannot be achieved, the clinician may choose to complete the bone graft first and place the implant in a second-stage procedure after several months of bone healing.
After implant placement, the surgical site is sutured as appropriate, and a postoperative management plan is established.
What Instruments Are Needed for a Crestal Sinus Lift?
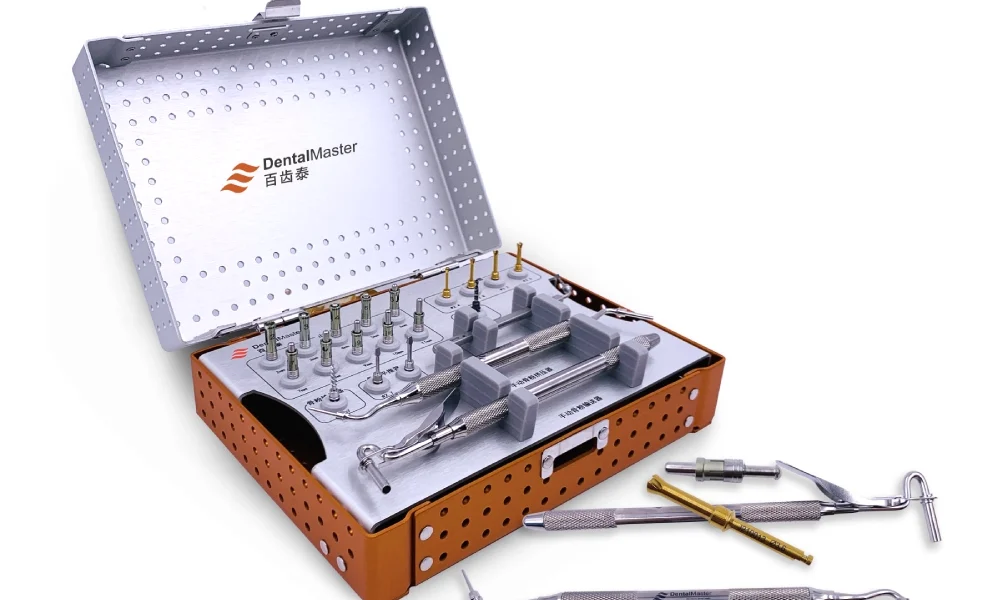
A complete crestal sinus lift kit should generally include the following instruments:
- Initial Drill: Used to locate and initially prepare the implant osteotomy.
- Bone-Grinding Drills of Different Diameters: Used to progressively enlarge the implant osteotomy and treat the bone of the sinus floor.
- Depth Gauge: Used to accurately measure the osteotomy depth during surgery.
- Stoppers of Different Lengths: Used with the bone-grinding drills to precisely control drilling depth.
- Bone Graft Carrier: Used to deliver bone graft material into the elevated space.
- Bone Graft Pusher: Used to push the graft material toward the sinus floor.
- Bone Graft Spreader: Used to distribute the graft material evenly within the elevated space.
- Surgical Handpiece: Used to drive the drills during osteotomy preparation.
- Irrigation System: Used to provide continuous irrigation and cooling during surgery.
- Instruments Used to Check Sinus Membrane Integrity: Such as auxiliary instruments for the Valsalva maneuver.
A complete crestal sinus lift kit should include not only drilling instruments but also auxiliary instruments for depth control, measurement, bone graft delivery, and bone graft distribution. Integrating the instruments required for different surgical steps into one system helps establish a more organized and continuous clinical workflow, reduces confusion when changing instruments during surgery, and improves procedural consistency and predictability.
What Precautions Should Be Taken After a Sinus Lift?
Proper postoperative care after a sinus lift is essential for surgical success and for reducing complications. Patients generally need to observe the following precautions:
- Take medications, including antibiotics and pain relievers, on time as instructed by the clinician, and attend follow-up appointments as scheduled.
- Avoid forcefully blowing the nose for the period specified by the clinician, usually one to two weeks after surgery, to prevent increased pressure within the maxillary sinus from affecting membrane healing or causing displacement of the graft material.
- Keep the mouth open when sneezing whenever possible to reduce sudden increases in pressure within the maxillary sinus.
- Avoid smoking and drinking alcohol. Smoking can significantly affect bone and soft-tissue healing and increase the risks of infection and implant failure.
- Temporarily avoid strenuous exercise and activities that may increase sinus pressure, such as diving or air travel. The specific recovery period should follow the clinician’s instructions.
- Do not repeatedly touch the surgical area with the hands or tongue, as this may interfere with wound healing.
- Maintain oral hygiene. A mouthwash recommended by the clinician may be used, but the surgical wound should not be directly irritated or brushed.
If persistent bleeding, worsening pain, fever, significant facial swelling, or abnormal nasal discharge, such as purulent discharge or nosebleeds, occurs after surgery, the patient should contact the clinician or seek medical attention promptly so that potential complications can be identified and managed at an early stage.
Conclusion
The primary purpose of a sinus lift is to increase the available bone volume in the posterior maxilla and provide stable bone support for dental implants, allowing patients who were previously unable to receive implants because of insufficient bone volume to undergo implant-supported restoration.
Crestal and lateral sinus lifts are the two main surgical approaches. They have different indications and technical characteristics, and it is not appropriate to determine simply that one is better than the other. The correct choice of technique should be based on the patient’s specific anatomical conditions, bone augmentation requirements, and the clinician’s experience.
Successful sinus lift treatment depends on several key factors: correct case selection, detailed preoperative CBCT planning, careful intraoperative protection of the sinus membrane, precise depth control, and standardized postoperative management. Neglecting any of these factors may affect the final treatment outcome.
For clinicians performing crestal sinus lifts, a well-designed and complete instrument system containing bone-grinding drills in multiple diameters, stoppers in 1 mm increments, a depth gauge, and bone graft delivery instruments can provide a more continuous and standardized clinical workflow, helping to improve procedural predictability and the consistency of treatment outcomes.