Translated and adapted from “骨增量中如何做好软组织减张”, published by Li Jun iShare on October 23, 2023. Clinical photographs, teaching illustrations and clinical observations are attributed to Dr. Li Jun and the publications identified in the source.
Following tooth loss, the alveolar ridge undergoes remodeling. The source article reports horizontal bone resorption of 29–63% and vertical resorption of 11–22%. Significant ridge resorption may require bone reconstruction before or during implant treatment.
Soft tissue release is an important part of bone augmentation because the flap must accommodate the augmented volume and allow primary wound closure. This article presents the original author’s explanation of flap release, commonly used techniques and errors that can limit flap advancement.
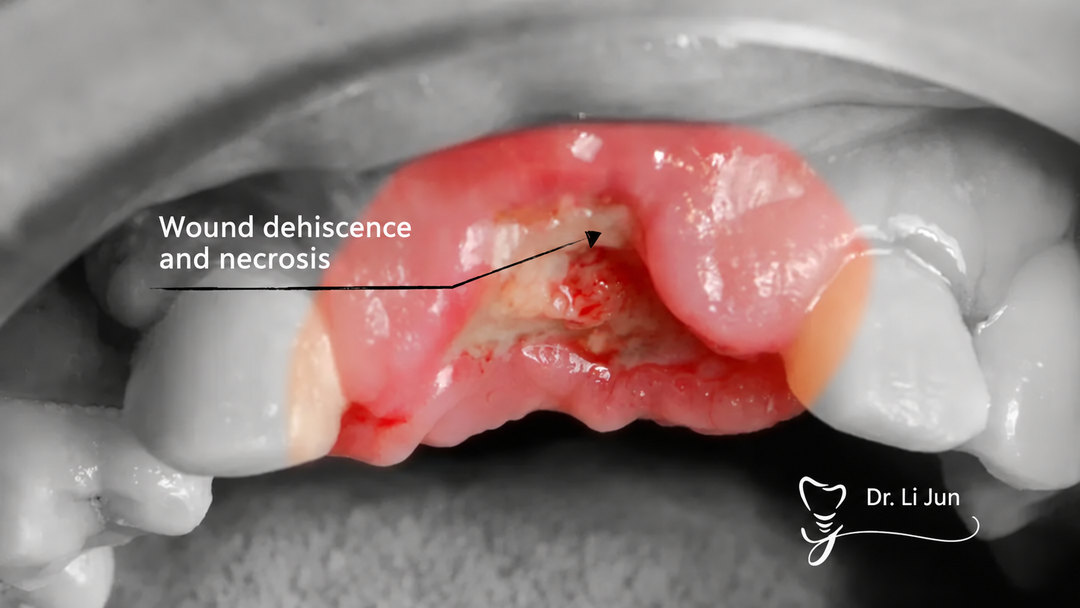
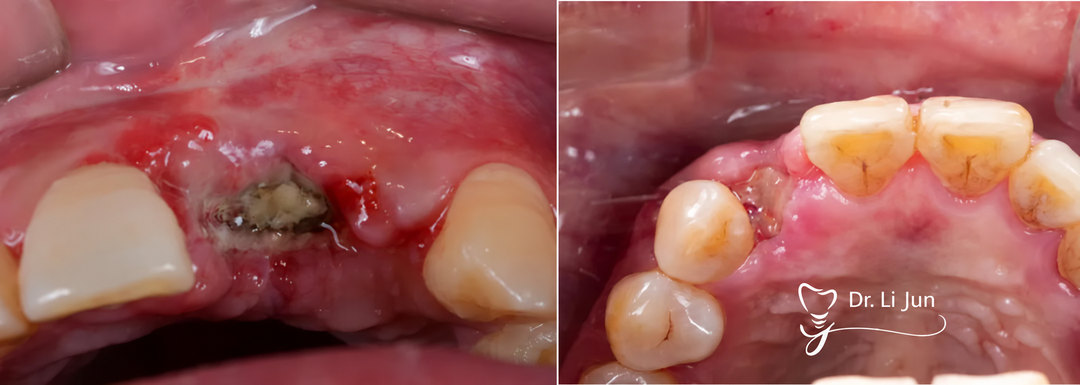
Why Does Tension Release Matter?
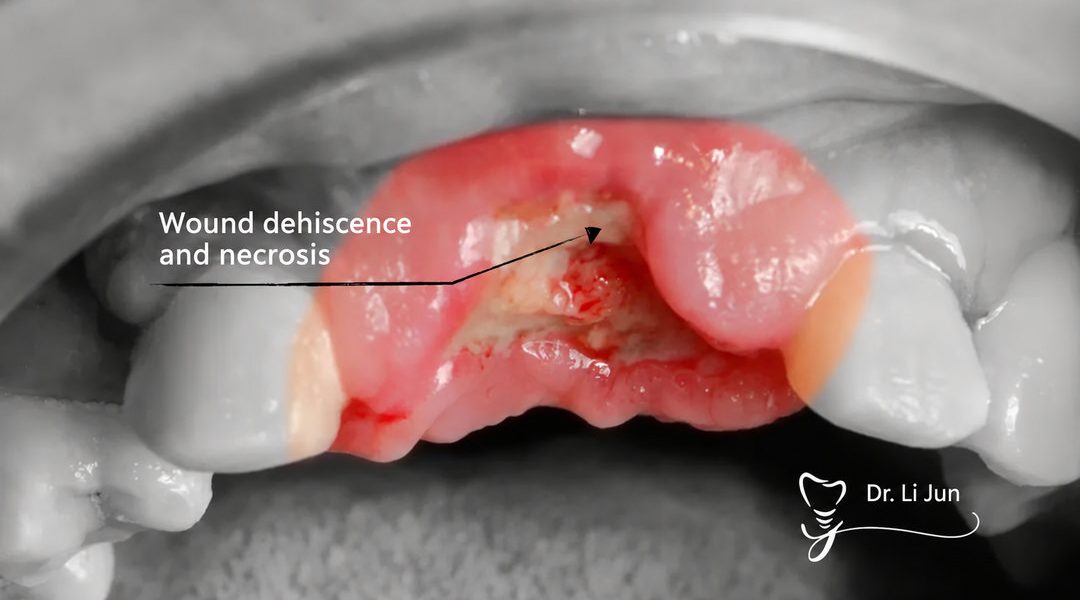
The clinical cases in the source show wound dehiscence at the two-week suture-removal appointment, with exposure of titanium mesh or graft material used in guided bone regeneration (GBR). The author identifies inadequate release as a common contributor to early wound opening.
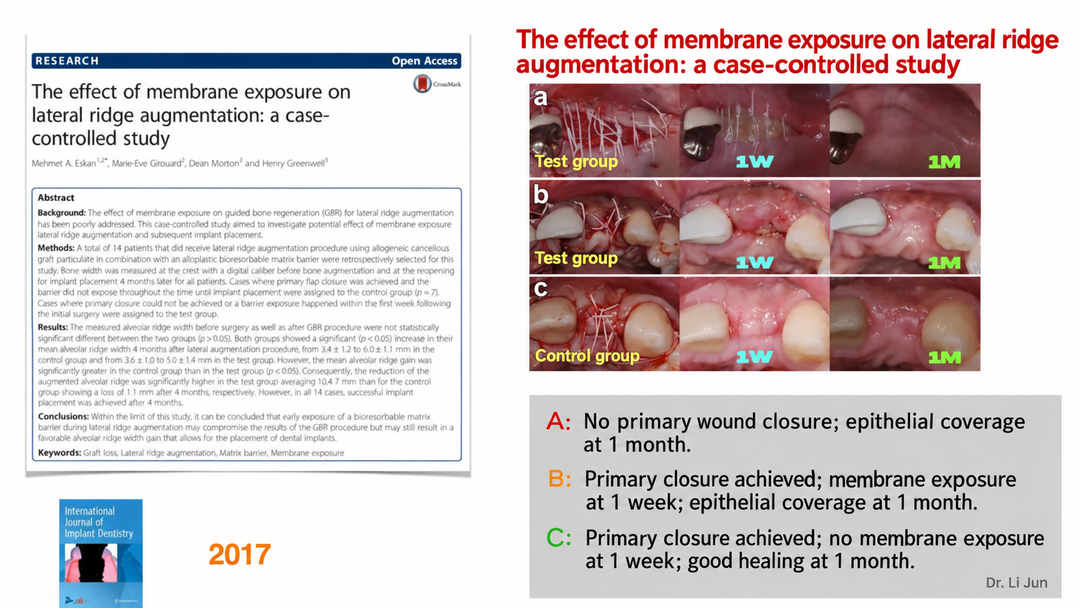
The article cites the 2017 case-controlled study, The effect of membrane exposure on lateral ridge augmentation: a case-controlled study. Its illustrations compare three healing patterns:
- Case A: Primary closure was not achieved; epithelial coverage was present at one month.
- Case B: Primary closure was achieved initially, followed by membrane exposure at one week and epithelial coverage at one month.
- Case C: Primary closure was achieved, no membrane exposure was seen at one week, and healing was satisfactory at one month.
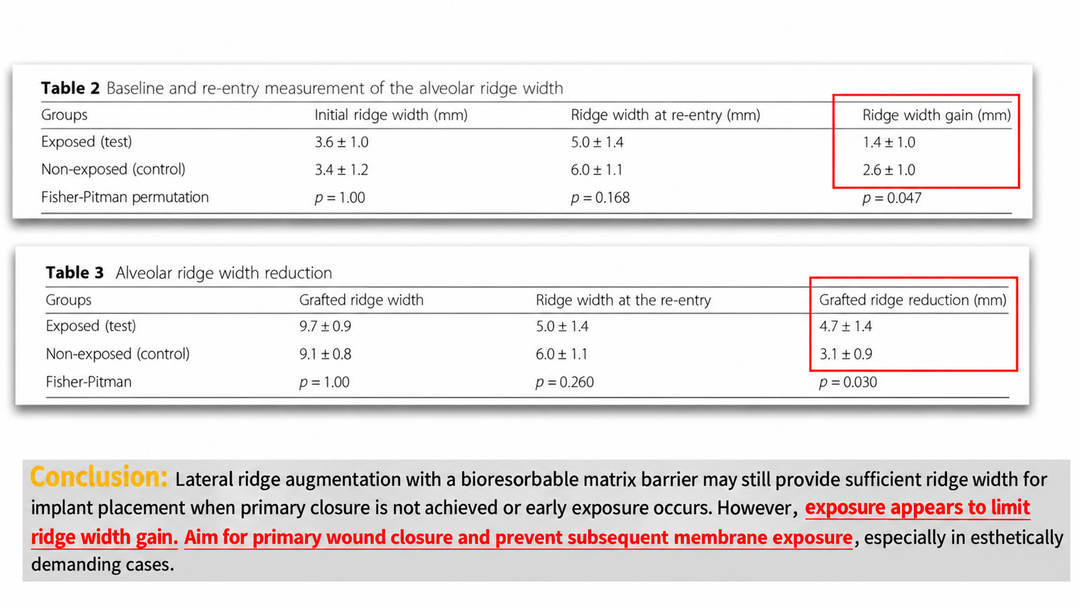
The study tables reproduced in the article report mean ridge-width gains of 1.4 ± 1.0 mm in exposed sites and 2.6 ± 1.0 mm in non-exposed sites. Mean grafted-ridge reduction was 4.7 ± 1.4 mm and 3.1 ± 0.9 mm, respectively.
The source’s interpretation is that early exposure may compromise the amount of ridge-width gain, even when sufficient bone remains for implant placement. Primary wound closure and prevention of subsequent membrane exposure are therefore important goals, particularly in esthetically demanding situations.
1. The Principles Behind Tension Release
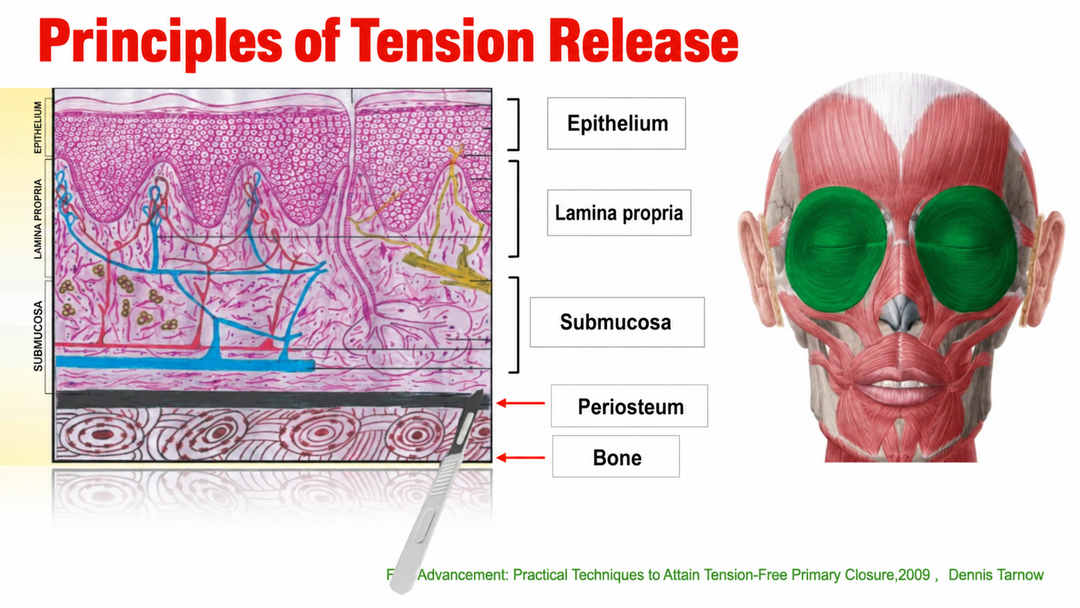
Bone augmentation commonly involves elevation of a full-thickness mucoperiosteal flap. The source explains the release mechanism by contrasting the relatively inelastic periosteum with the more flexible overlying mucosal tissues.
The author’s central principle is to release the periosteal restriction and separate the relevant tissue planes so that the flap can advance. Greater effective separation can provide more mobility; the release should remain controlled and appropriate to the anatomy and tissue condition.
The accompanying tissue diagram identifies the epithelium, lamina propria, submucosa, periosteum and bone. In the English figure, the label corresponding to 骨膜 is Periosteum; the original slide incorrectly repeated the English word “Epithelium” at that position.
2. Clinical Steps for Buccal Flap Release
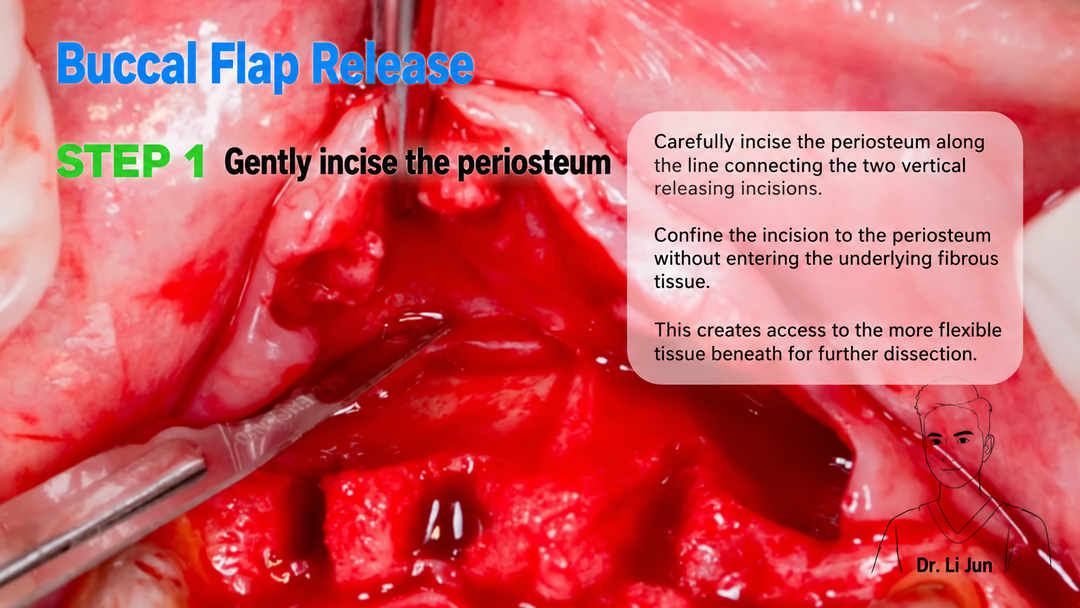
Step 1: Gently Incise the Periosteum
The source describes carefully incising the periosteum along the line connecting the two vertical releasing incisions. The initial incision is intended to open access for subsequent dissection rather than cut deeply into the underlying tissues.
The author emphasizes limiting this incision to the periosteum and avoiding unnecessary penetration into the underlying fibrous tissue.
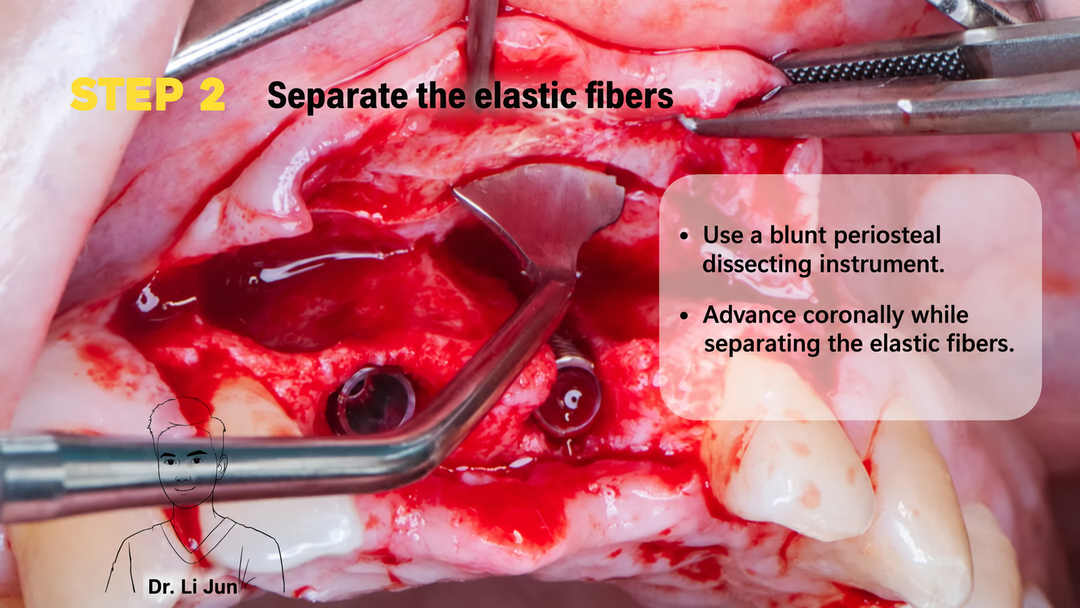
Step 2: Separate the Elastic Fibrous Tissue
The next slide describes blunt dissection with a suitable periosteal instrument, using a coronal advancement movement to separate the elastic fibrous tissues.
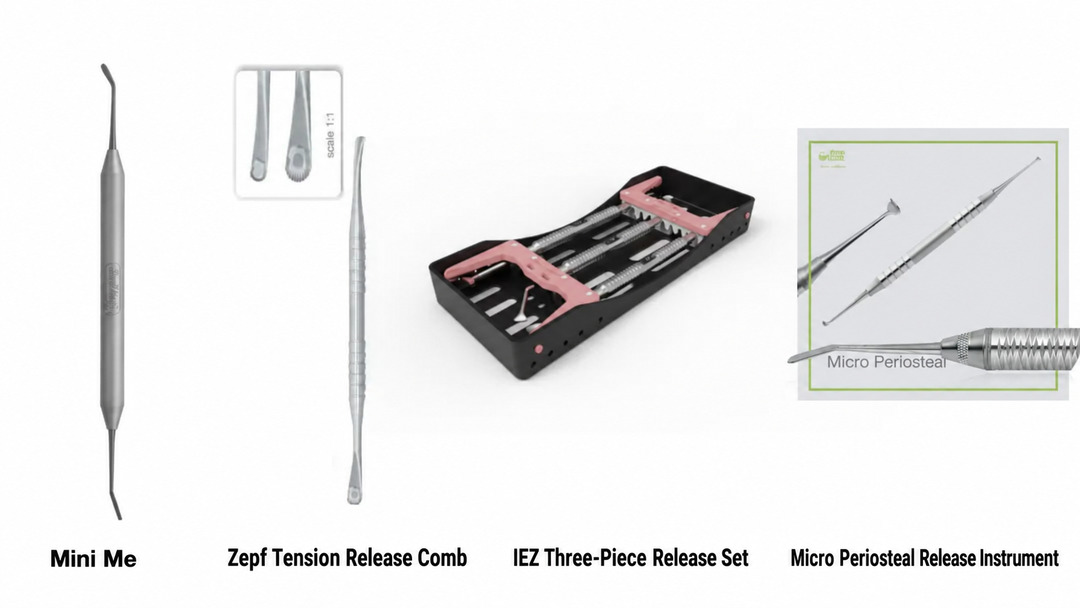
The instruments illustrated in the source include Mini Me, a tension release comb, an IEZ three-piece release set and a micro periosteal release instrument. These are examples used by the author; instrument selection depends on the clinical situation.
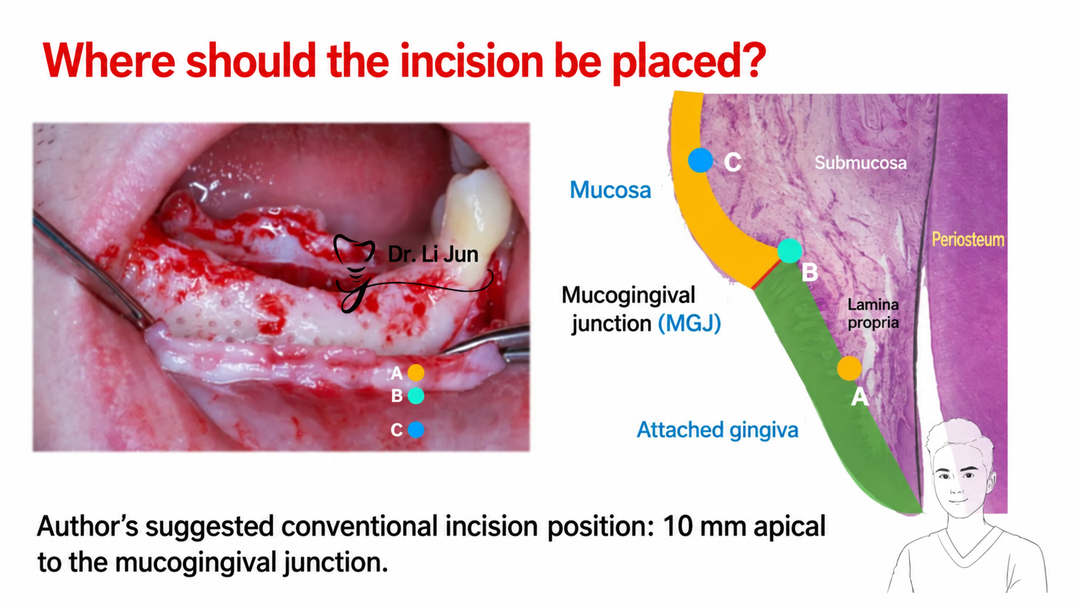
Where Is the Incision Positioned?
The anatomical slide distinguishes the mucosa, mucogingival junction (MGJ) and attached gingiva. The author’s suggested conventional incision position is approximately 10 mm apical to the mucogingival junction. This is presented as the source author’s recommendation, rather than a universal location for every case.
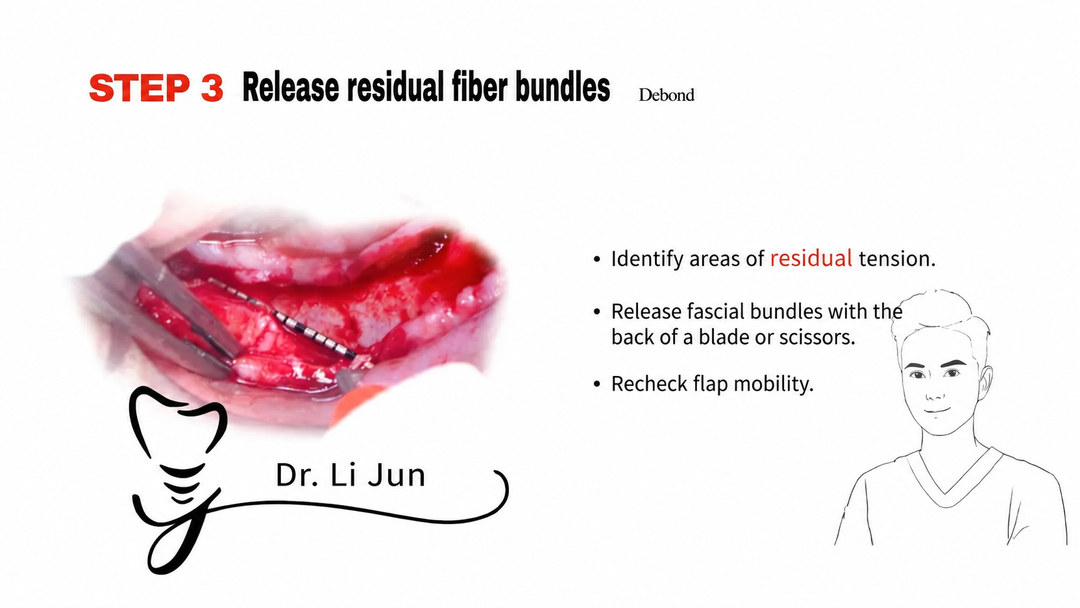
Step 3: Release Residual Fiber Bundles
After the initial release, the author describes checking for areas of persistent tension, releasing remaining fascial bundles with the back of a blade or scissors, and reassessing flap mobility.
The purpose is to identify residual restrictions instead of assuming that one incision has provided complete release.
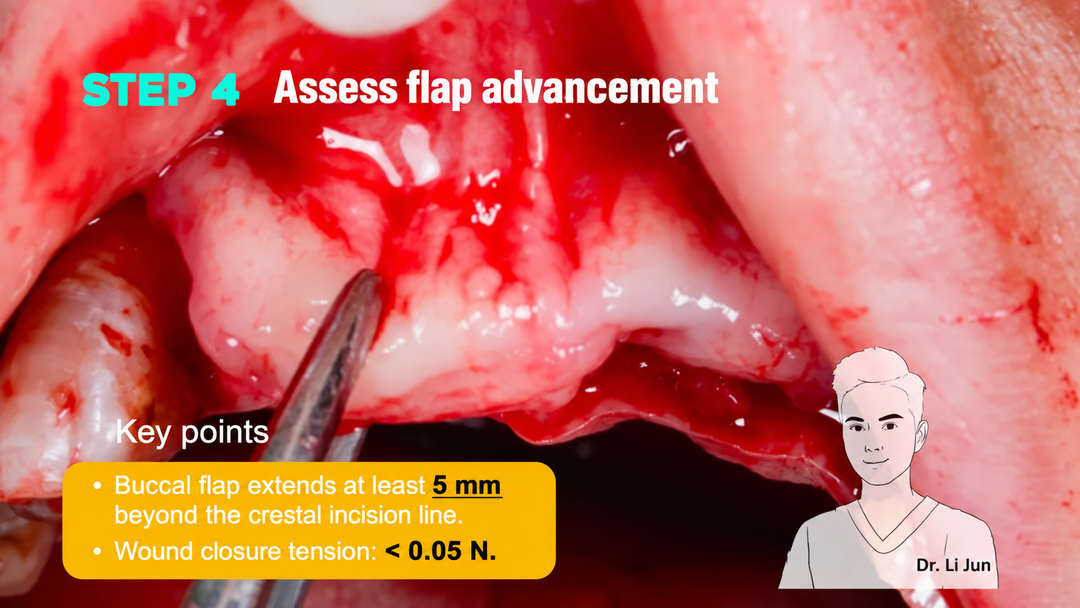
Step 4: Assess the Amount of Flap Advancement
The source associates tension-free closure with a closure tension below 0.05 N. It also describes a clinical assessment in which the buccal flap can extend at least 5 mm beyond the crestal incision line.
These numerical criteria are reproduced from the source. They should not be read as a guarantee that early dehiscence cannot occur or as a replacement for case-specific assessment.
3. Other Tension Release Techniques

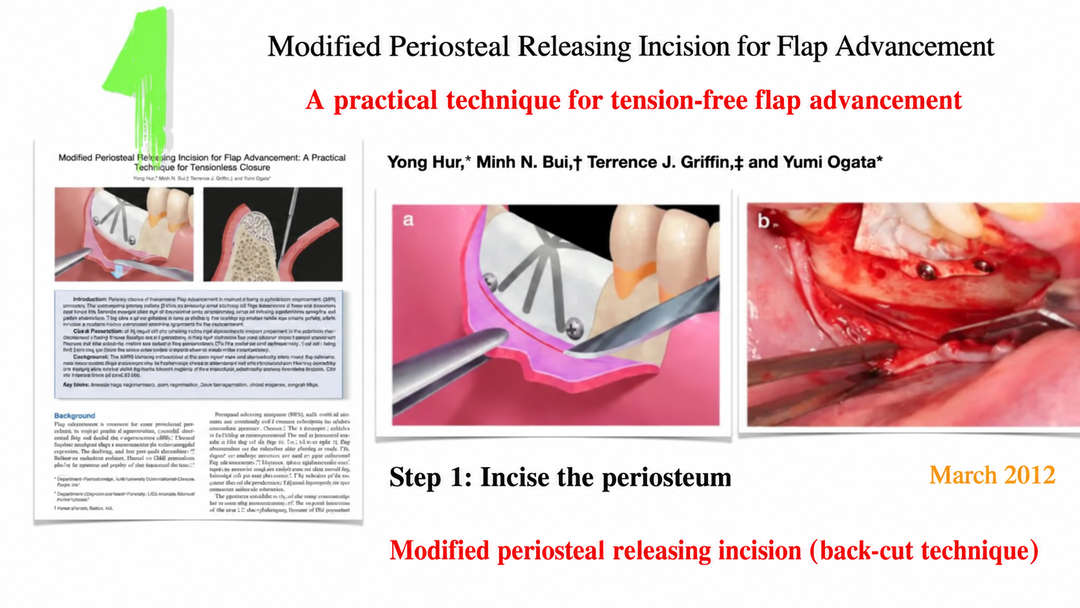
Modified Periosteal Releasing Incision: The Back-Cut Technique
The article presents Modified Periosteal Releasing Incision for Flap Advancement: A Practical Technique for Tensionless Closure by Yong Hur, Minh N. Bui, Terrence J. Griffin and Yumi Ogata, with a slide dated March 2012.
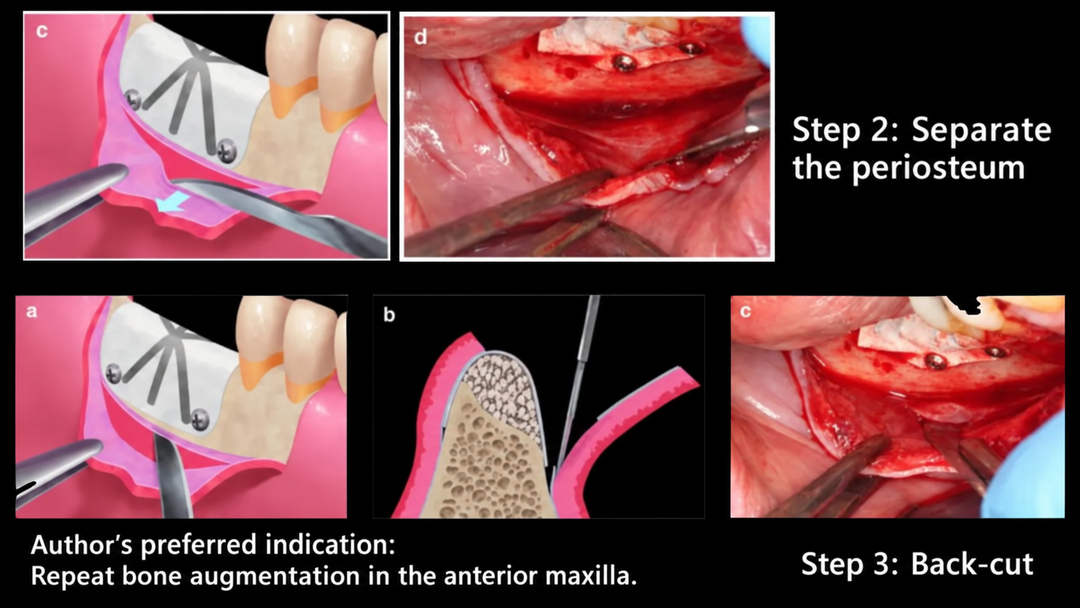
The illustrations show three stages: incising the periosteum, separating the periosteum and performing a back-cut.
The author considers this approach particularly useful in repeat augmentation procedures where scar tissue makes release more difficult. The source specifically highlights repeat bone augmentation in the anterior maxilla as a preferred application, because sharp dissection can help release scarred tissues efficiently.
Double Flap Design
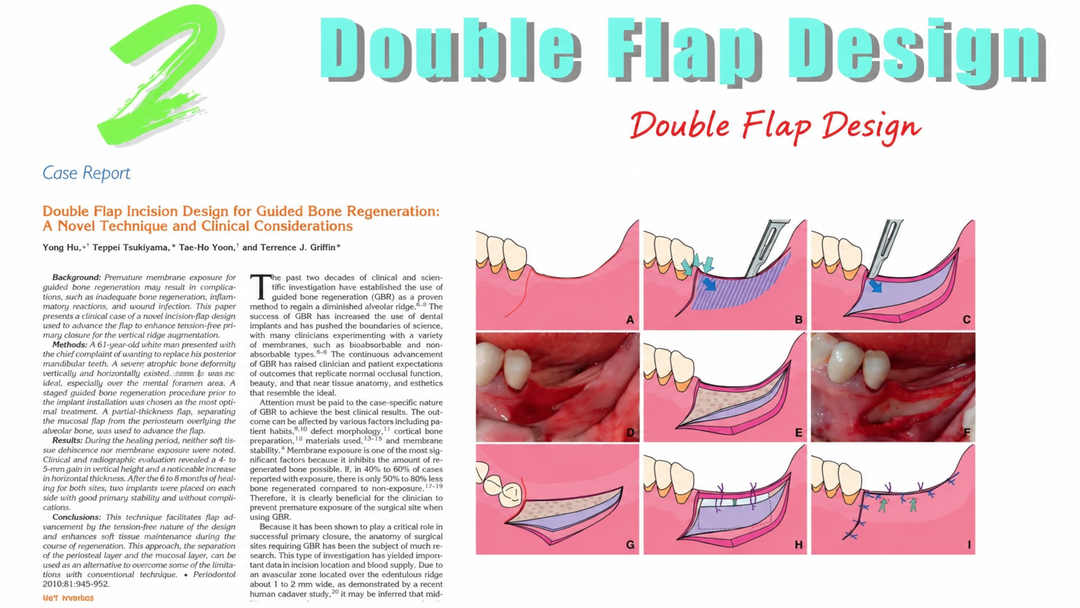
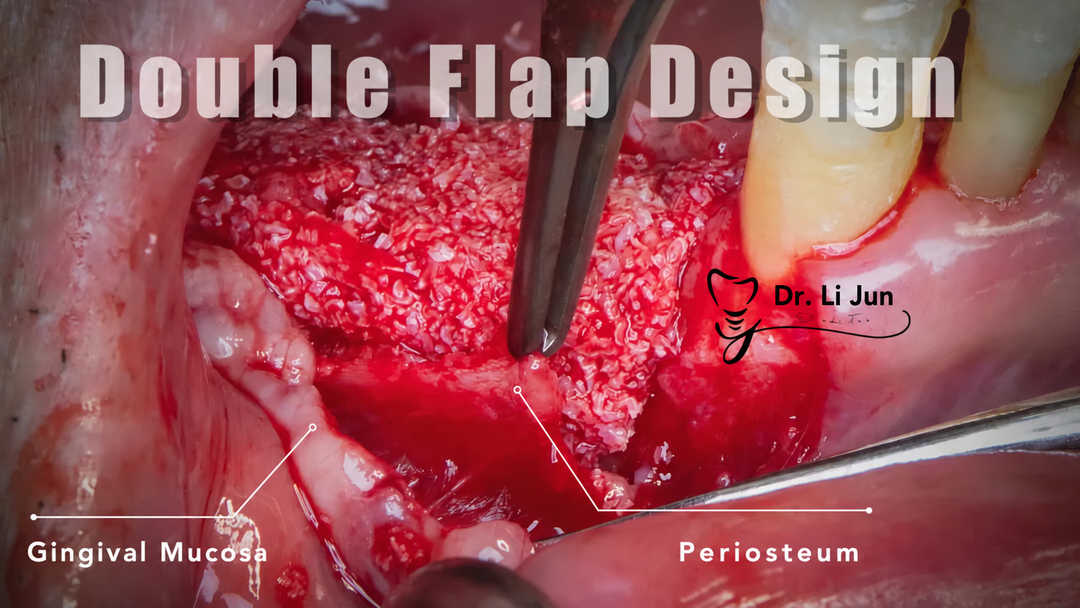
The source also presents Double Flap Incision Design for Guided Bone Regeneration: A Novel Technique and Clinical Considerations. This approach separates the mucosal flap from the periosteal layer to obtain additional advancement and facilitate layered closure.
In the author’s assessment, it can provide extensive release because the periosteal separation is nearly complete. However, it requires a high level of surgical skill, and separation becomes difficult when periosteal adhesions are present. The author recommends considering it where the periosteum is healthy, particularly in the posterior mandible.
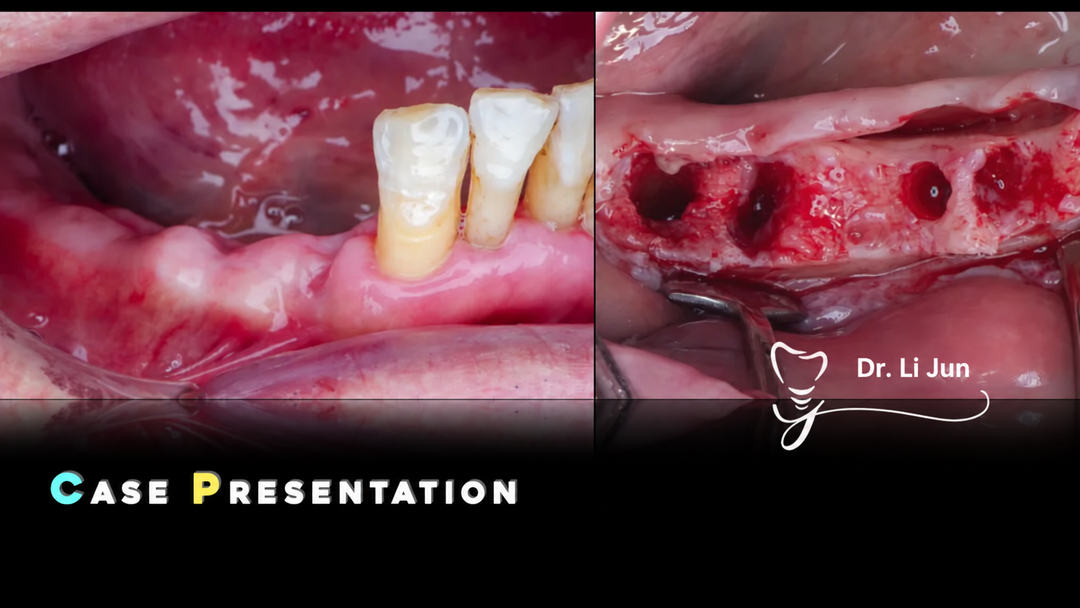
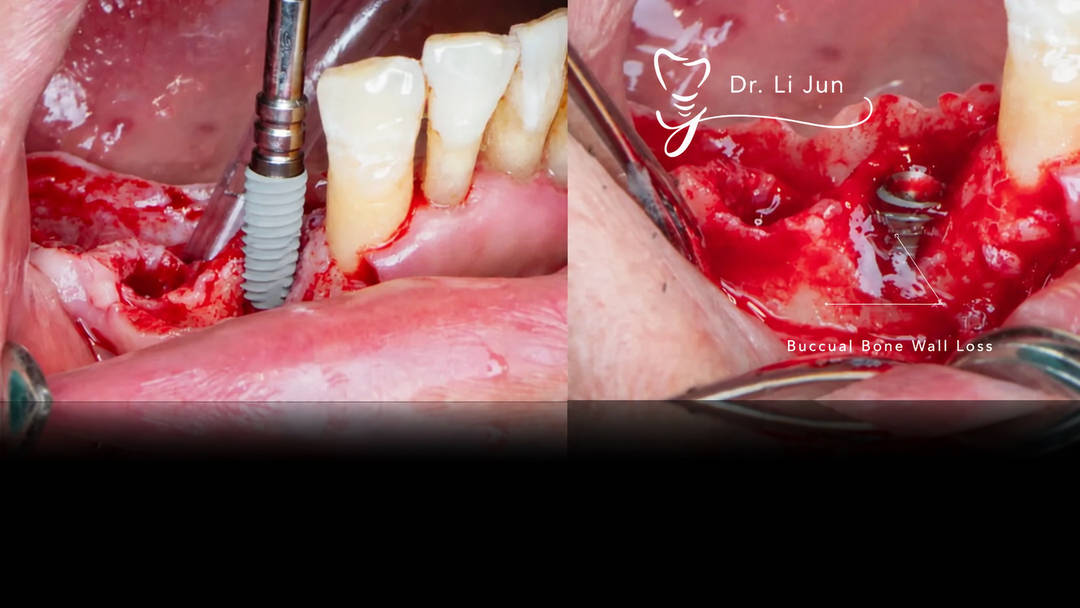
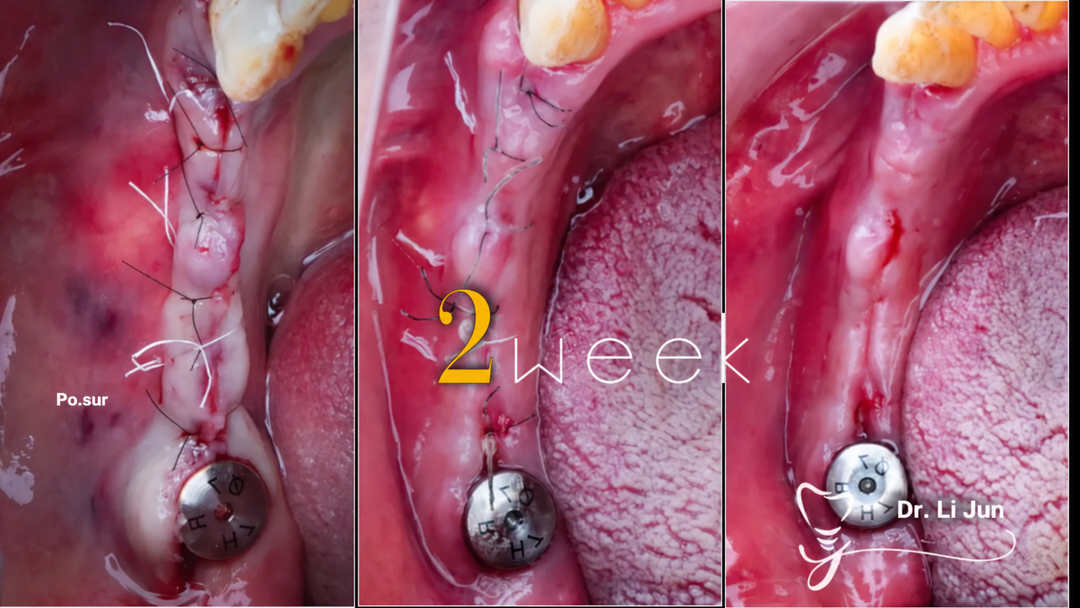
The accompanying case photographs show the operative site, separation of the mucosal and periosteal layers, and subsequent wound closure and healing.
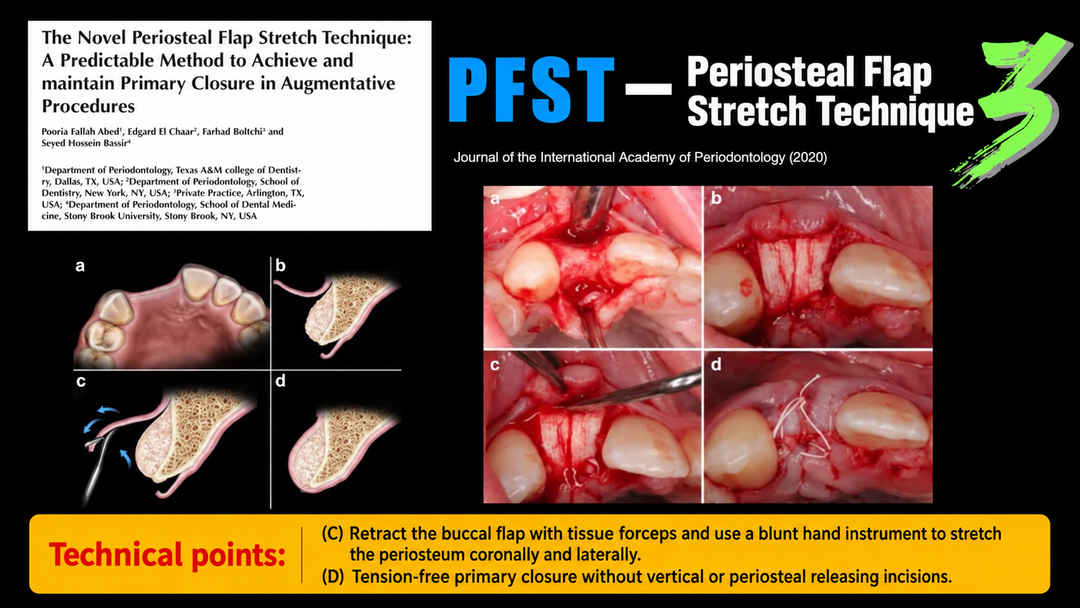
Periosteal Flap Stretch Technique (PFST)
A third approach is introduced through the 2020 publication The Novel Periosteal Flap Stretch Technique: A Predictable Method to Achieve and Maintain Primary Closure in Augmentative Procedures.
The slide describes retracting the buccal flap with tissue forceps and using a blunt hand instrument to stretch the periosteum coronally and laterally. The illustrated objective is tension-free primary closure without vertical or periosteal releasing incisions.
The source author expresses reservations about this technique, reporting that comb-like sweeping may leave portions of the periosteum incompletely released and provide limited advancement. This is the author’s clinical opinion and should be distinguished from the claims of the cited publication.
4. Common Errors During Tension Release

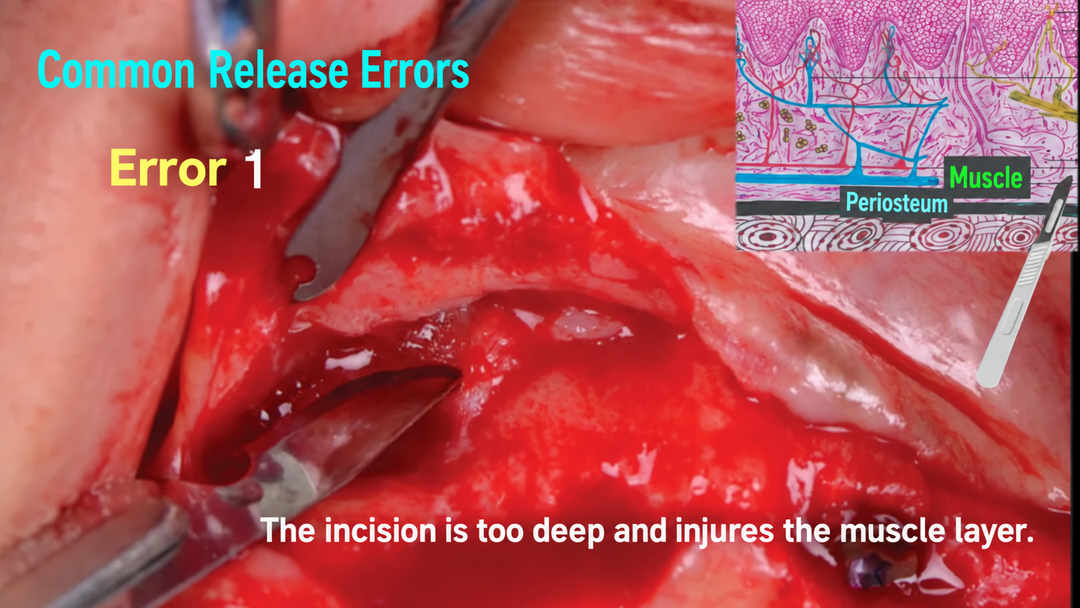
Error 1: Cutting Too Deeply
The first error illustrated is an incision extending into the muscle layer rather than remaining confined to the intended periosteal plane.
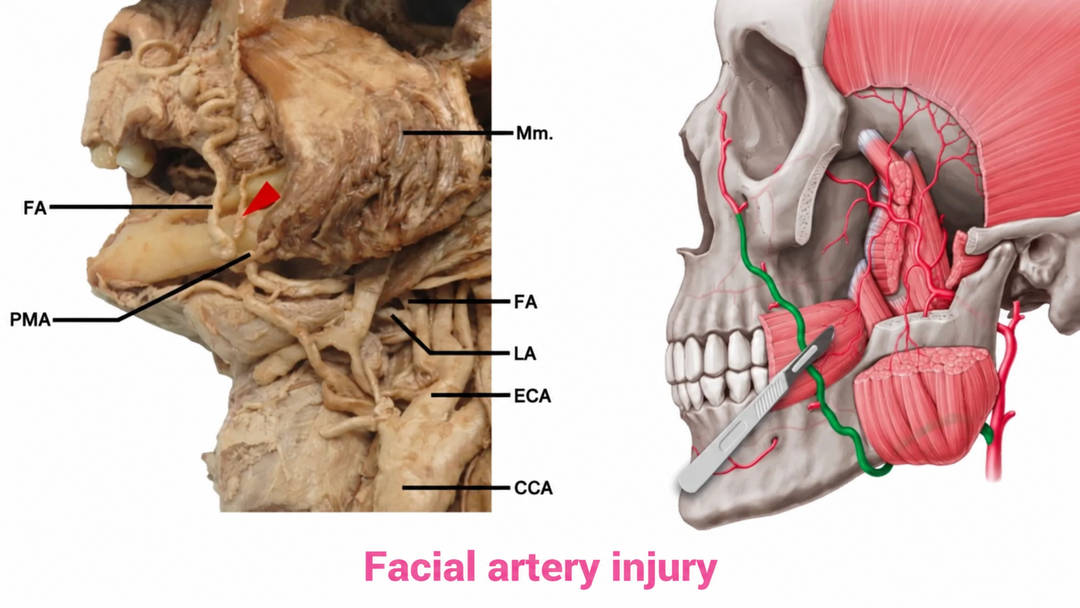
The author explains that unnecessary muscle injury can increase the postoperative tissue reaction and lead to bruising. A related anatomical illustration highlights the facial artery and the possibility of vascular injury.
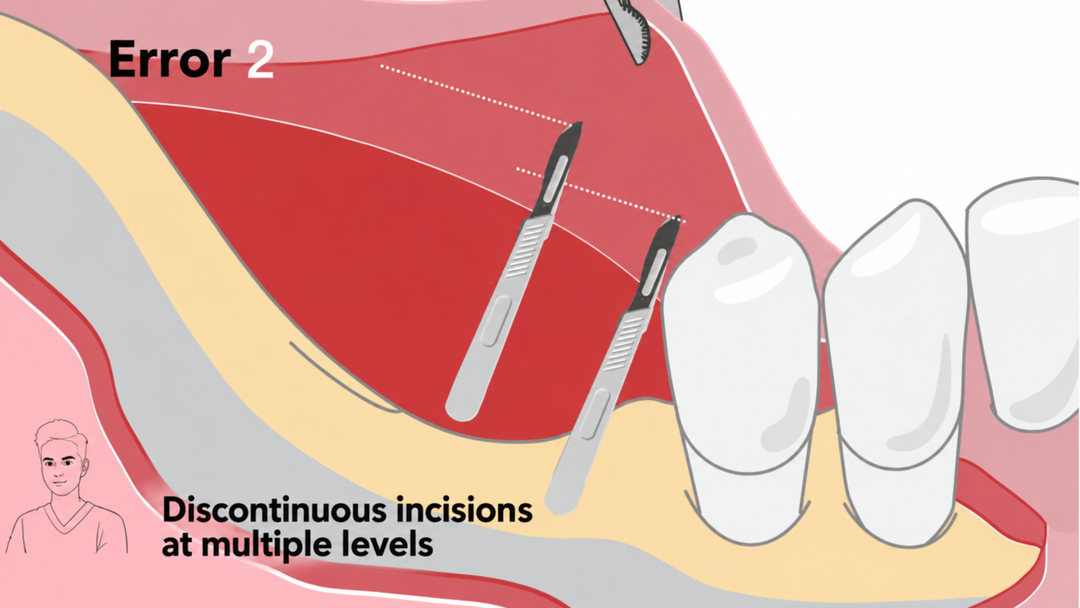
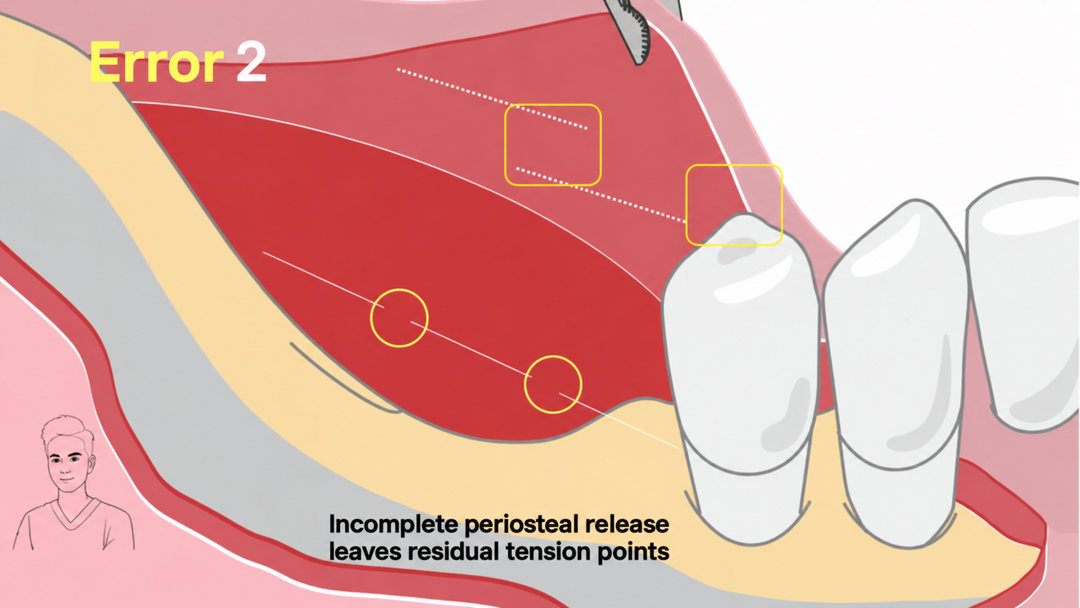
Error 2: Discontinuous or Incomplete Periosteal Incisions
The second error is a series of interrupted incisions at different levels, or incisions that do not completely release the intended periosteal restriction.
Residual tissue bridges can continue to pull on the flap. The source therefore emphasizes a continuous, controlled periosteal release followed by reassessment for remaining tension points.
5. Tension Release Around the Mental Foramen
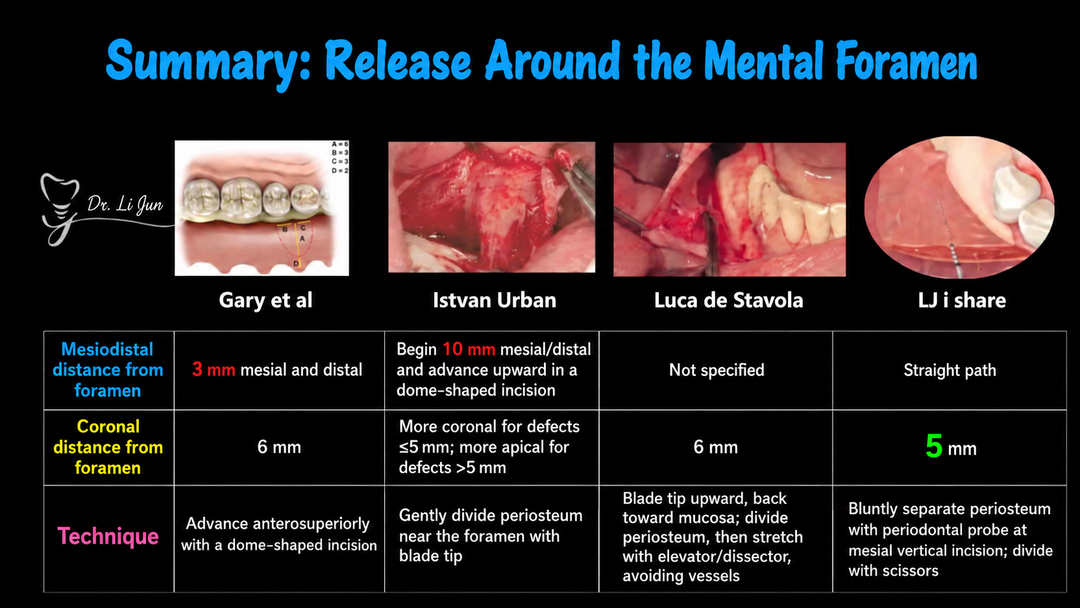
The original article compares several approaches to releasing the flap around the mental foramen. The dimensions below are those shown in the teaching slides and are attributed to their respective sources; they are not interchangeable instructions for every anatomical situation.

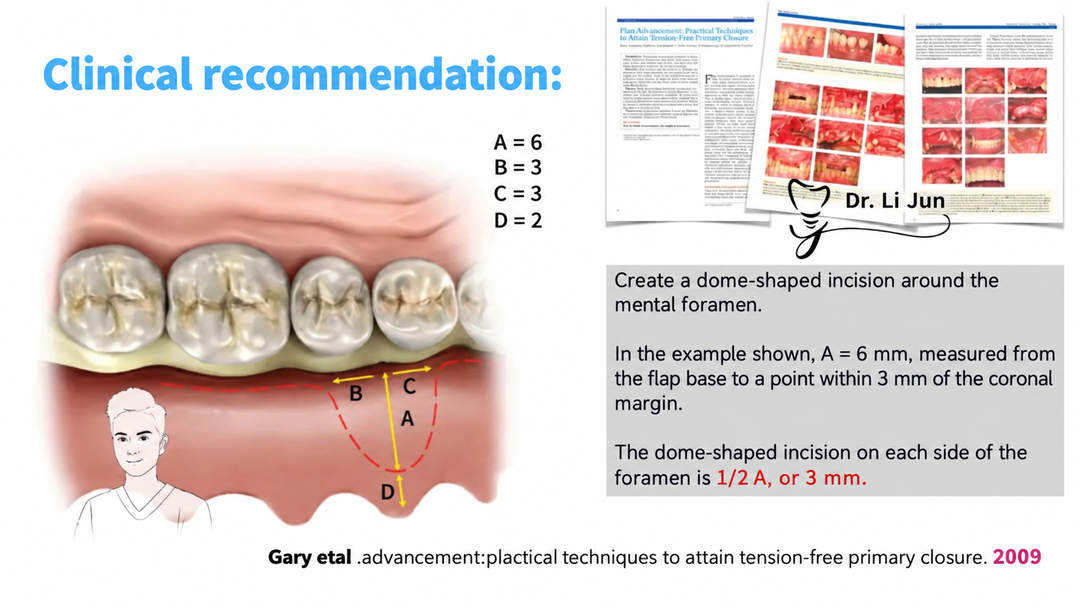
Dome-Shaped Release Illustrated in the 2009 Reference
The slide linked to Flap Advancement: Practical Techniques to Attain Tension-Free Primary Closure describes a dome-shaped incision around the mental foramen.
In its illustrated example, A = 6 mm, measured from the flap base to a point within 3 mm of the coronal margin. The incision on each side is described as one-half of A, or 3 mm. The diagram additionally marks B = 3, C = 3 and D = 2.
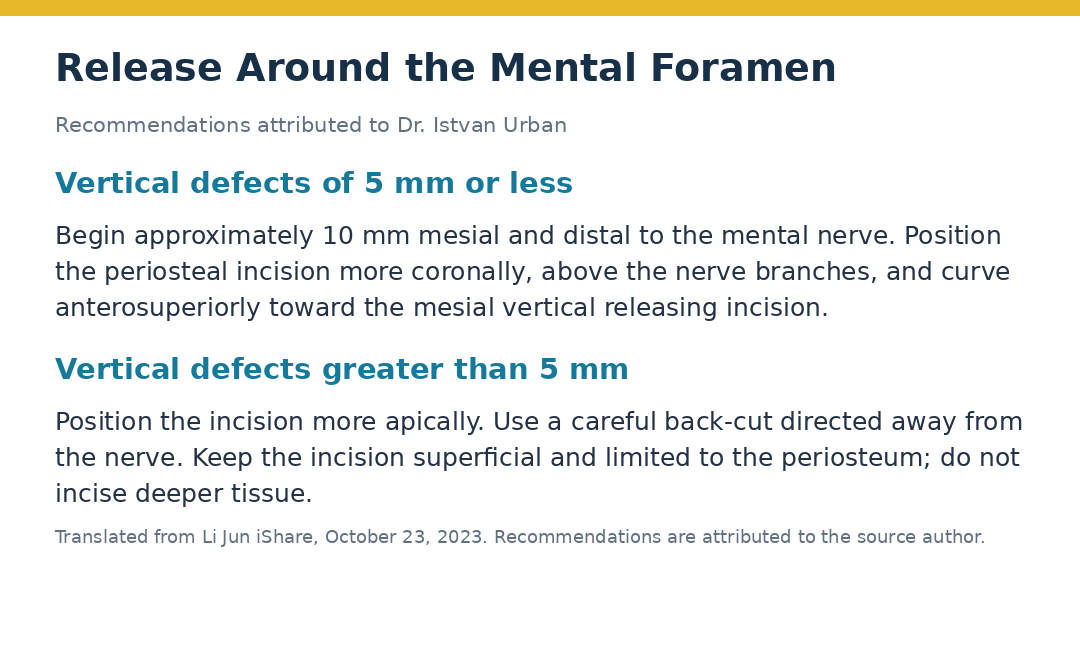
Recommendations Attributed to Dr. Istvan Urban
For vertical defects of 5 mm or less, the source slide describes beginning approximately 10 mm mesial and distal to the mental nerve, placing the periosteal incision more coronally above the branches, and curving anterosuperiorly toward the mesial vertical releasing incision.
For defects greater than 5 mm, the slide describes a more apical incision position. It emphasizes a careful back-cut directed away from the nerve, with a superficial incision confined to the periosteum and no incision into the deeper tissues.
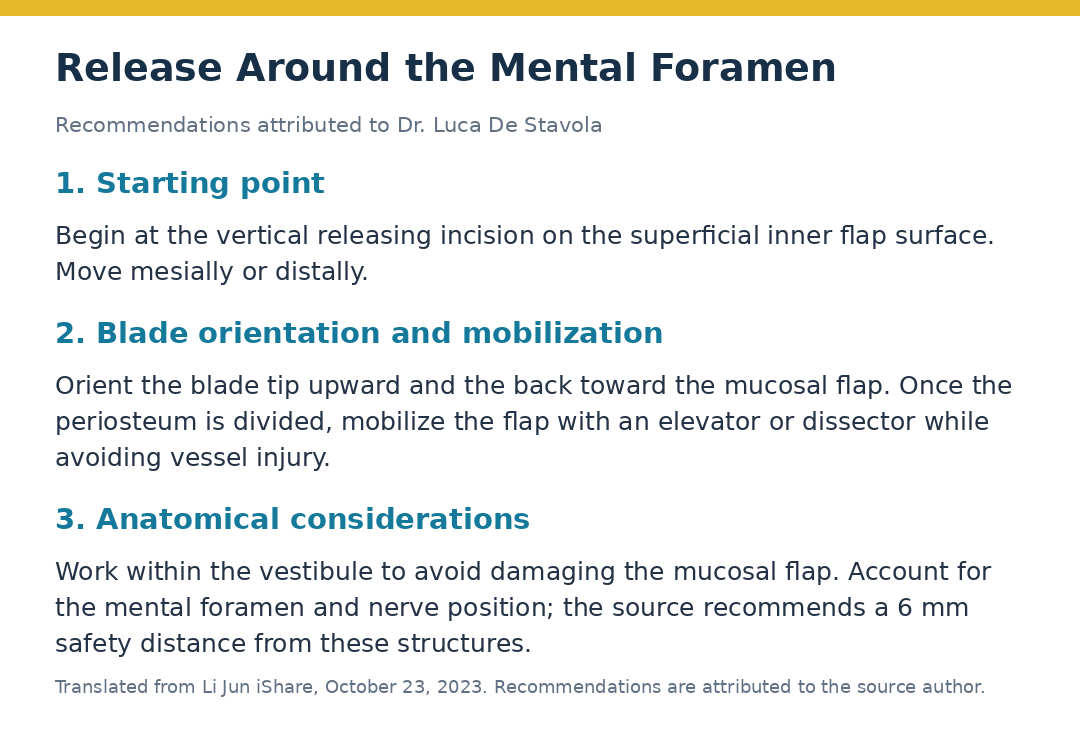
Recommendations Attributed to Dr. Luca De Stavola
The source slide describes beginning at a vertical releasing incision, contacting the superficial inner surface of the flap and moving mesially or distally. It illustrates the blade tip directed upward and the back of the blade toward the mucosal flap.
After periosteal division, an elevator or dissector is used to mobilize the flap while avoiding vessel injury. The slide emphasizes working within the vestibule and accounting for the location of the mental foramen and nerve. It gives a suggested safety distance of 6 mm from these structures.
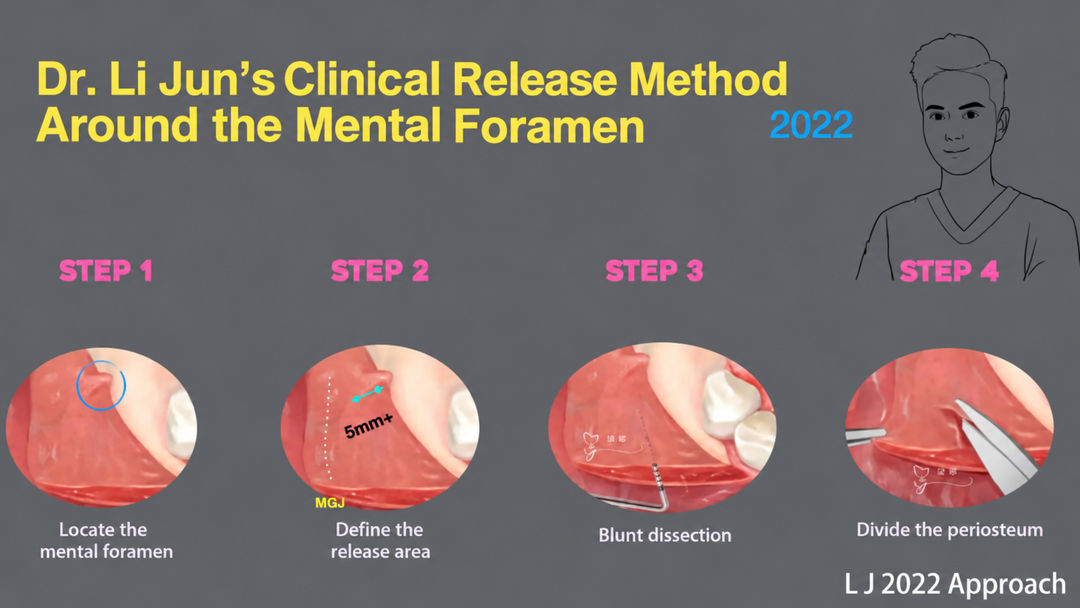
Dr. Li Jun’s 2022 Clinical Approach
The author’s own sequence is illustrated in four stages:
- Locate the mental foramen.
- Define the release area.
- Perform blunt dissection.
- Divide the periosteum with scissors.
The accompanying comparison slide describes using a periodontal probe for blunt periosteal separation at the mesial vertical incision, followed by scissors to divide the periosteum. It shows a coronal distance of 5 mm and contrasts a straight dissection path with the curved paths shown in other approaches.
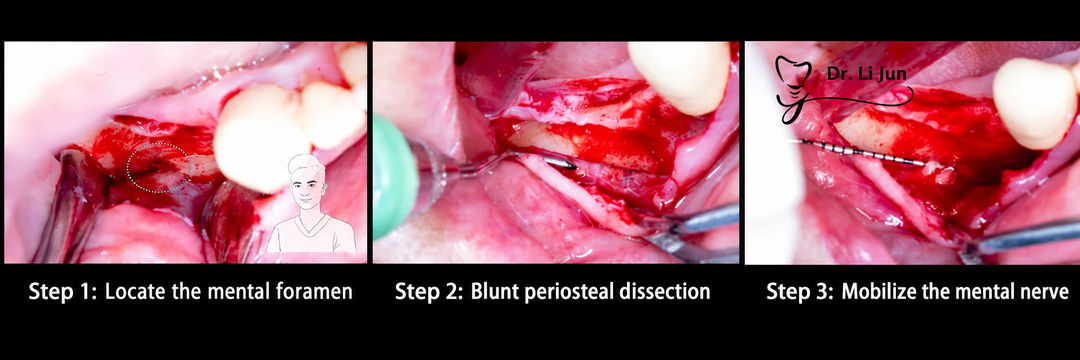
A separate three-panel clinical sequence illustrates locating the mental foramen, blunt periosteal dissection and mobilization of the mental nerve.
6. Summary

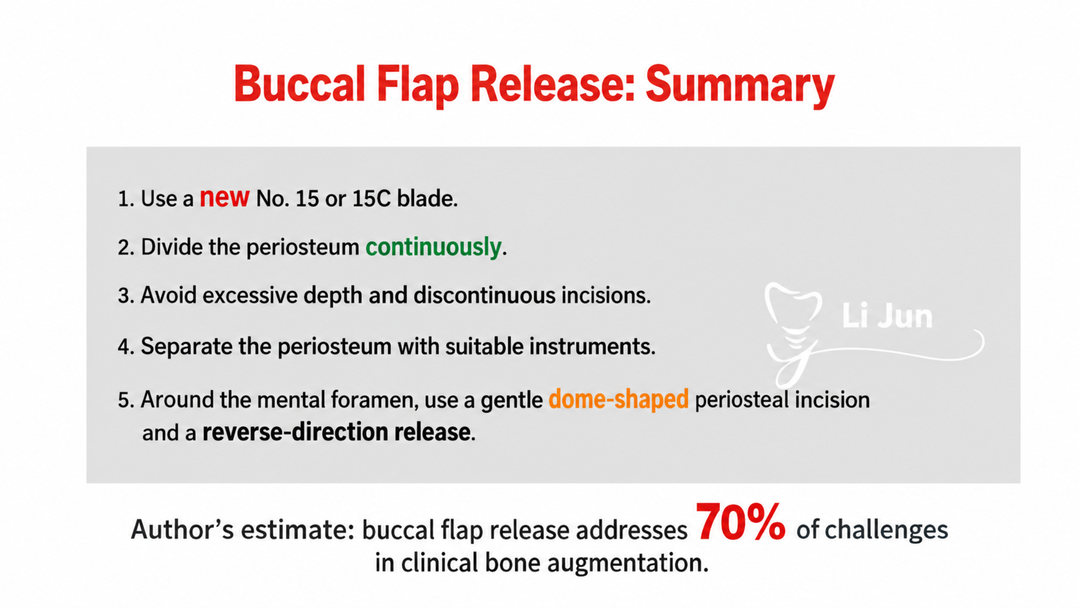
The source author summarizes buccal flap release around five practical points:
- Use a new No. 15 or 15C blade.
- Perform a continuous periosteal release.
- Avoid excessive incision depth and discontinuous incisions.
- Use suitable instruments to separate the periosteum and reassess mobility.
- Around the mental foramen, pay particular attention to the release path and neurovascular anatomy; the author illustrates a gentle dome-shaped periosteal incision and a reverse-direction release.
The final slide states the author’s estimate that buccal flap release addresses 70% of the challenges encountered in clinical bone augmentation. This is presented as a teaching observation, not a quantified outcome established by the cited studies.
The central message of the article is to understand the tissue plane, obtain sufficient flap mobility and assess closure without relying on sutures to overcome unresolved tension.