When clinics or dental laboratories purchase additional Bicon compatible prosthetic components, they often encounter a problem: the product names look similar, but after opening the specification options, they still need to select the connection size, diameter, height, and angle. Finding a “Bicon compatible abutment” is only the first step in purchasing.
A more practical purchasing sequence is to first confirm the implant well size, then select the abutments, impression components, analogs, and tools according to the restorative workflow. This makes it easier to check specifications and reduces the inconvenience of purchasing again after missing supporting components.
This article introduces Bicon connection features, main components, and the information to confirm before ordering.
What Is Bicon’s Locking-Taper Connection
How Are the Implant and Abutment Connected?
The original Bicon system uses a 1.5° locking-taper connection. The tapered post at the bottom of the abutment enters the corresponding tapered well inside the implant, forming a connection through the fit of the tapered surfaces. This differs from connection methods that rely on a central abutment screw for tightening.
- Implant well: the internal part of the implant used to connect the abutment.
Why Does “Screw-Free Connection” Not Mean That All Restorative Components Have No Screws?
It is necessary to distinguish between the implant-to-abutment connection and the connection between the abutment and the overlying restorative structure.
Locking taper describes the connection between the implant and abutment. The overlying restorative structure may still use a screw-retained design. For example, fixed-detachable restorative systems include corresponding restorative screws and tools.
Therefore, when purchasing components, “no central abutment fixation screw required” should not be understood as meaning that the entire restorative structure uses no screws. Whether screws, sleeves, or other accessories are required should be confirmed according to the specific components and restorative design.
Which Bicon Compatible Prosthetic Components Are Available?
When purchasing, finding components according to the stage of use and workflow is more convenient than searching only by name.
Healing and Temporary Components
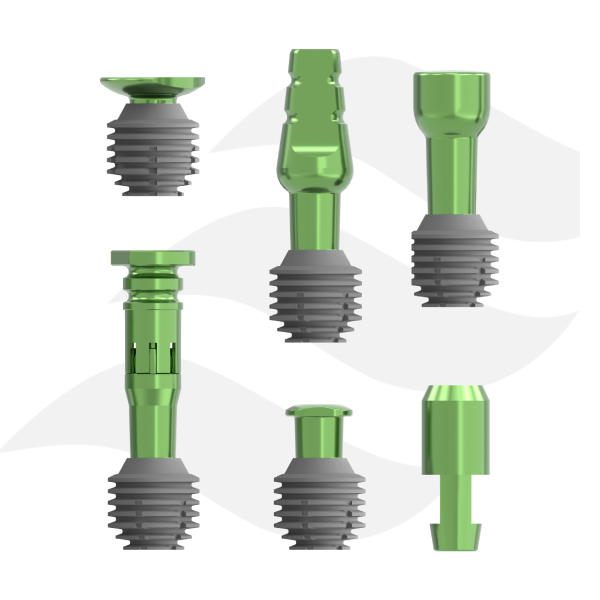
This group includes healing plugs, cover components, healing abutments, and temporary abutments.
Straight and Angled Non-Shouldered Abutments
Non-shouldered abutments include 0° straight and 15° angled versions. When purchasing, in addition to distinguishing the angle, the connection size, abutment diameter, and corresponding height also need to be checked.
Fixed-Detachable Abutments
Fixed-Detachable Abutments are another type of restorative component that needs to be confirmed separately. The category page includes straight and angled options.
When purchasing this type of abutment, the supporting components required for the overlying restoration should also be checked. Matching abutment connection sizes do not mean that upper components from different series can be directly interchanged.
Impression Components and Analogs
Components related to conventional impressions and model fabrication include titanium impression posts and sleeves, and titanium implant analogs. Digital model workflows require checking the corresponding digital analogs.
The names of these products can be easily confused. When making an inquiry, it is best to explain whether you are purchasing additional intraoral impression components or analogs for model fabrication.
Scannable Components and Millable Abutment Blanks
The category page also lists scannable temporary abutments and millable abutment blanks for custom fabrication.
If using a digital workflow, in addition to confirming the connection specifications, the digital library, design software, and fabrication requirements should also be checked with the dental laboratory. Support for digital applications should not be directly understood as compatibility with all software or fabrication workflows.
What Needs to Be Checked Before Ordering?
Confirm the Implant Well Size First
The connection size should be the first item on the purchasing checklist.
Common Bicon connection sizes include 2.0, 2.5, and 3.0 mm. The abutment post size needs to match the implant well size: a 2.0 mm post corresponds to a 2.0 mm well, a 2.5 mm post corresponds to a 2.5 mm well, and a 3.0 mm post corresponds to a 3.0 mm well.
The connection size here is a different parameter from the implant outer diameter and the abutment body diameter. For example, the outer diameter information in the implant record cannot be used directly as the abutment post size.
The most reliable references for checking are the implant record, packaging label, or a clearly identified product model. If only the implant outer diameter and length are available, it is recommended to confirm the well size before selecting components.
Then Check the Abutment Diameter, Height, and Angle
After confirming the connection size, the dimensions of the abutment itself also need to be checked.
| Item to Check | Information to Confirm |
|---|---|
| Connection specification | Corresponding well or post size |
| Abutment diameter | The specific part indicated by the diameter in the product drawing |
| Height | Height name, measurement starting point, and endpoint |
| Angle | Straight or angled version, and the specific angle |
| Package contents | Whether the required screws, sleeves, or other accessories are included |
Height is particularly easy to misunderstand. Bone Penetration Height, Transosseous Height, and Gingival Height on product pages should not be treated as the same measurement without checking.
If the clinical record states “2 mm height required,” it is necessary to clarify further when purchasing: which section does this 2 mm refer to? The required specification should be confirmed by the dentist or technician using the product dimension drawing.
Components Need to Match the Restorative Workflow
The components that need to be checked for conventional impressions, digital scanning, and custom fabrication are not exactly the same.
For conventional impression workflows, the impression posts, sleeves, and corresponding analogs should be checked. For digital workflows, the scanning components, digital library, and model analog requirements should be confirmed. When using millable abutment blanks, the relevant specifications need to be confirmed with the fabrication provider in advance.
Taking a dental laboratory purchasing additional analogs as an example, even if it is already known that the implant has a 2.5 mm well, it is still necessary to explain whether a conventional stone model or a model produced after digital design is being made. Connection size is the foundation, and the specific workflow also affects the purchasing choice.
Do Restorative Tools Need to Be Purchased Separately?
Most commonly used restorative tools are already included in our implant instrument kit. If the clinic already has the corresponding instrument kit, it is recommended to check the existing configuration before deciding whether to purchase additional tools.
If only one restorative tool is needed, please contact customer service to confirm whether it can be supplied separately. Providing the following information when making an inquiry will make confirmation easier:
- Tool name or a clear photo;
- Model of the abutment or other component used with it;
- Required connection specification;
- Model or configuration photo of the existing instrument kit.
Similar tool appearances do not mean that their working-end dimensions and uses are the same. Especially for seating, holding, or removal tools, the corresponding components should be confirmed to avoid purchasing specifications that cannot be used together.
Frequently Asked Questions
How Do I Choose a Suitable Bicon Compatible Abutment?
First confirm the implant well size, then check the abutment type, diameter, height, and angle according to the restorative plan. Selection cannot be completed based only on the name “Bicon compatible.”
What Is the Difference Between Implant Diameter and Well Size?
Implant diameter describes the external dimension of the implant, while well size describes the internal connection area. When selecting the abutment connection specification, the well needs to be checked, and the two should not be confused.
Do Bicon Compatible Abutments Require Screws?
The connection location needs to be distinguished. A locking-taper connection can be used between the implant and abutment, while the overlying restorative structure may use screws. The specific component design and supporting instructions should be followed.
Can Conventional Analogs and Digital Analogs Be Directly Interchanged?
They should not be considered interchangeable only because their connection specifications are the same. The model fabrication method, product structure, and relevant digital workflow requirements also need to be confirmed.
Can Restorative Tools Be Purchased Individually?
If you need to purchase a tool individually, please contact customer service and provide the tool name or photo, supporting components, and required specifications. Customer service will confirm the specific supply situation.
Before Ordering, Check the Connection, Components, and Tools Again
When purchasing Bicon compatible prosthetic components, first confirm the connection size, then check the component purpose, diameter, height, angle, and supporting tools one by one. This will make the purchasing process smoother.
You can view related products in Dentalssale’s Bicon compatible category. If you cannot determine the specification, or only need to purchase an additional restorative tool, please contact customer service for assistance before ordering.
Bicon is a registered trademark of its trademark owner. This article uses the name to describe product compatibility; compatible products sold by Dentalssale should not therefore be regarded as original Bicon products or as having received its endorsement.